From my experience all software developers are now security engineers whether they know it, admit to it or do it. Your code is now the security of the org you work for.
Target of this workshop is to learn how to make an initially unsecured (reactive) web application more and more secure step-by-step.
You will make your hands dirty in code in the following steps:
-
Add spring boot security starter dependency for simple auto configuration of security
-
Customize authentication configuration (provide our own user store + encryption)
-
Add authorization (access controls) to web and method layers
-
Implement automated security integration tests
-
Experiment with new OAuth2 Login Client and Resource Server of Spring Security 5
1. Requirements for this workshop
-
Git
-
A Java JDK (Java 8, 11 or 14 are supported and tested)
-
Any Java IDE capable of building with Gradle (IntelliJ, Eclipse, VS Code, …)
-
Basic knowledge of Reactive Systems and reactive programming using Spring WebFlux & Reactor
-
Robo 3T to look inside the embedded MongoDB instance
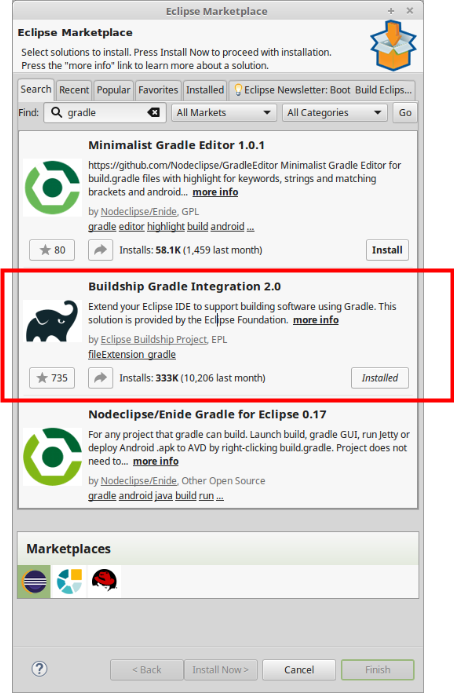
As we are building the samples using Gradle your Java IDE should be capable use this. As IntelliJ user support for Gradle is included by default. As an Eclipse user you have to install a plugin via the marketplace
To get the workshop project you either can just clone the repository using
git clone https://github.com/andifalk/reactive-spring-security-5-workshop.git security_workshopor
git clone git@github.com:andifalk/reactive-spring-security-5-workshop.git security_workshopor simply download it as a zip archive.
After that you can import the workshop project into your IDE
-
IntelliJ: "New project from existing sources…"
-
Eclipse: "Import/Gradle/Existing gradle project"
-
Visual Studio Code: Just open the corresponding project directory
2. Common Web Security Risks
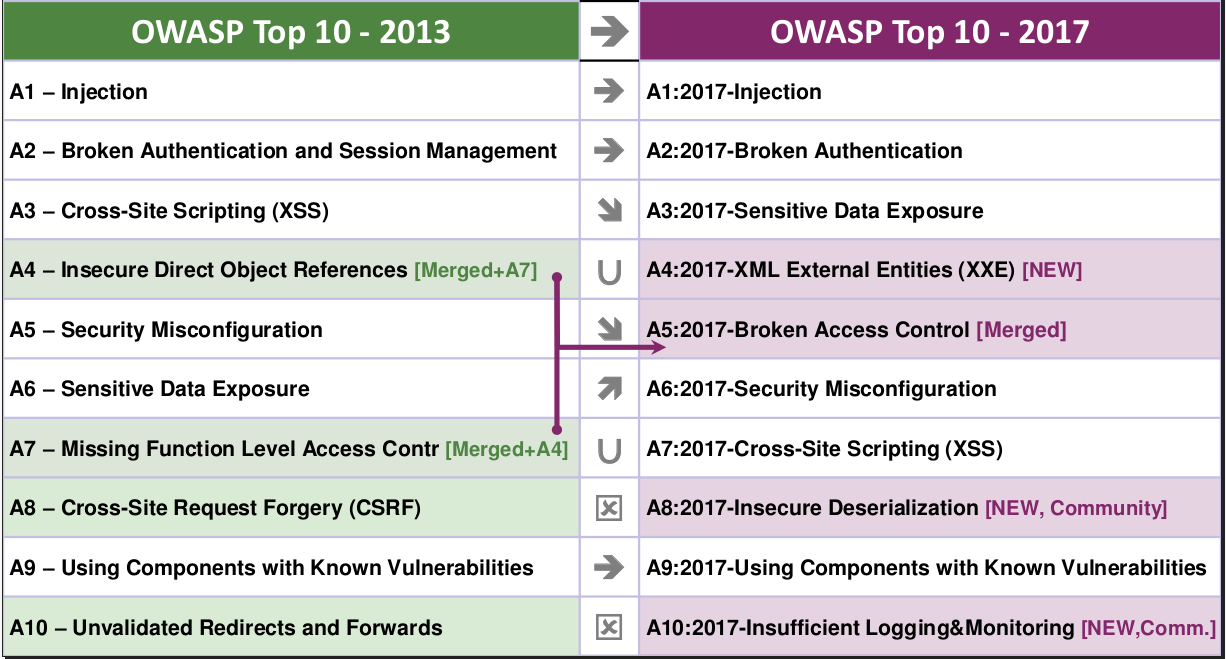
In this workshop you will strive various parts of securing a web application that fit into the OWASP Top 10 2017 list.
We will look at:
The Open Web Application Security Project has plenty of further free resources available.
As a developer you may also have a look into the OWASP ProActive Controls document which describes how to develop your applications using good security patterns. To help getting all security requirements right for your project and how to test these the Application Security Verification Standard can help you here.
|
You will find more sources of information about security referenced in the References section. |
3. Reactive Systems & Streams
The following subsections give a very condensed introduction to the basics of Reactive Systems,
the Project Reactor and Spring WebFlux.
This might help to better understand the sample application for beginners of Reactive.
Reactive Systems are Responsive, Resilient, Elastic and Message Driven (Asynchronous).
-
Responsiveness means the system responds in a timely manner and is the cornerstone of usability
-
Resilience means the system stays responsive in the face of failure
-
Elasticity means that the throughput of a system scales up or down automatically to meet varying demand as resource is proportionally added or removed
-
Message Driven systems rely on asynchronous message-passing to establish a boundary between components that ensures loose coupling
Reactive Streams is an initiative to provide a standard for asynchronous stream processing with non-blocking back pressure..
-
Back-Pressure: When one component is struggling to keep-up, the system as a whole needs to respond in a sensible way. Back-pressure is an important feedback mechanism that allows systems to gracefully respond to load rather than collapse under it.
3.1. Project Reactor
The project Reactor is a Reactive library for building non-blocking applications on the JVM based on the Reactive Streams Specification and can help to build Reactive Systems.
Reactor is a fully non-blocking foundation and offers backpressure-ready network engines for HTTP (including Websockets), TCP and UDP.
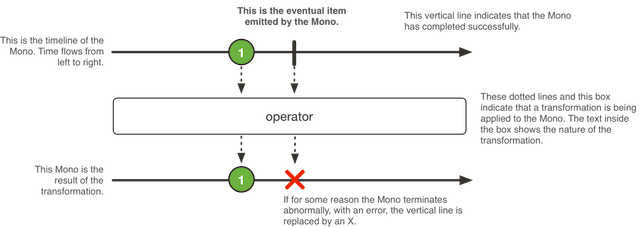
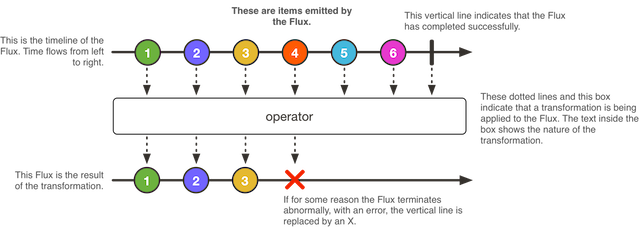
Reactor introduces composable reactive types that implement Publisher but also provide a rich vocabulary of operators, most notably Flux and Mono.
A Mono<T> is a specialized Publisher<T> that emits at most one item and then optionally terminates with an onComplete signal or an onError signal.
A Flux<T> is a standard Publisher<T> representing an asynchronous sequence of 0 to N emitted items, optionally terminated by either a completion signal or an error.
3.2. Spring WebFlux
Spring WebFlux was added in Spring Framework 5.0. It is fully non-blocking, supports Reactive Streams back pressure, and runs on servers such as Netty, Undertow, and Servlet 3.1+ containers.
Spring Webflux depends on Reactor and uses it internally to compose asynchronous logic and to provide Reactive Streams support. It provides two programming models:
-
Annotated Controllers: This is uses the same annotations as in the Spring MVC part
-
Functional Endpoints: This provides a lambda-based, lightweight, functional programming model
4. Intro-Lab: Reactive Programming
Before we dive into the world of security, you have the chance to get a first glimpse on the difference between imperative and reactive programming style.
To do this we will look into the project intro-labs/reactive-playground.
The following resources might be helpful for first steps into the reactive world:
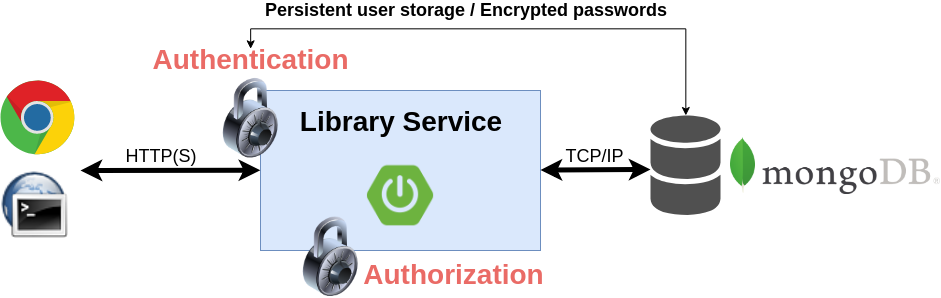
5. The workshop application
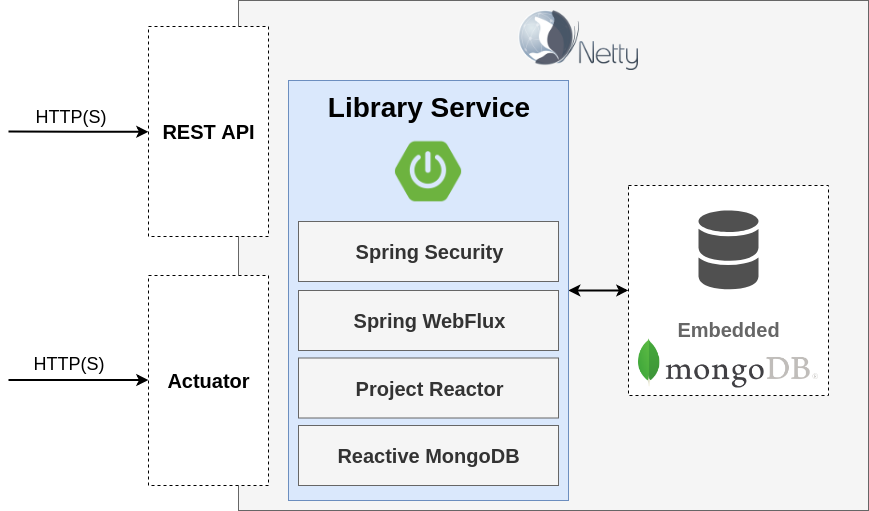
In this workshop you will be provided a finished but completely unsecured reactive web application. This library server application provides a RESTful service for administering books and users.
You can find this provided workshop application in sub project lab-1/initial-library-server.
This will also be your starting point into the hands-on part that we will dive into shortly.

The RESTful service for books is build using the Spring WebFlux annotation model and the RESTful service for users is build using the Spring WebFlux router model.
The application contains a complete documentation for the RESTful API build with spring rest docs which you can find in the directory build/asciidoc/html5 after performing a full gradle build.
The domain model of this application is quite simple and just consists of Book and User. The packages of the application are organized as follows:
-
api: Contains the complete RESTful service
-
business: All the service classes (quite simple for workshop, usually containing business logic)
-
dataaccess: All domain models and repositories
-
config: All spring configuration classes
-
common: Common classes used by several other packages
|
To call the provided REST API you can use curl or httpie. For details on how to call the REST API please consult the REST API documentation which also provides sample requests for curl and httpie. |
There are three target user roles for this application:
-
Standard users: A standard user can borrow and return his currently borrowed books
-
Curators: A curator user can add or delete books
-
Administrators: An administrator user can add or remove users
If you are going into reactive systems this works best if all layers work in non-blocking reactive style. Therefore the application is build using:
-
Spring 5 WebFlux on Netty
-
Spring Data MongoDB with reactive driver
-
In-memory Mongodb to have an easier setup for the workshop
6. Basic Security Labs
To start the workshop please begin by adapting the lab-1/initial-library-server
|
If you are not able to keep up with completing a particular step you always can just start over with the existing application of next step. For example if you could not complete the lab 1 in time just continue with lab 2 using lab-1/complete-library-server as new starting point. |
6.1. Run the initial application
To ensure your java environment is configured correctly please run the initial workshop application.
To achieve this run the class com.example.library.server.InitialLibraryServerApplication in project lab-1/initial-library-server.
This should also start the embedded MongoDB instance. In case you get an error here telling that the corresponding port 40495 is already bound to another service then please change the configuration to a different port in file application.yml:
spring:
data:
mongodb:
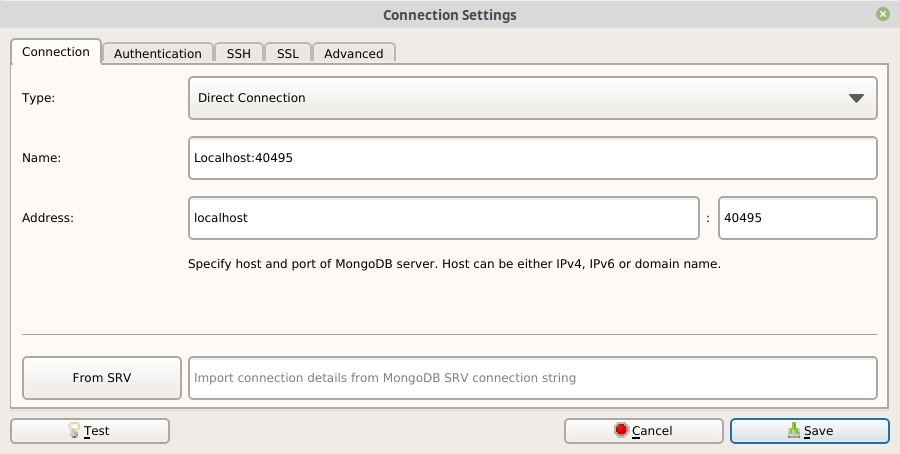
port: 40495To look into the embedded MongoDB instance the UI tool Robo 3T is very helpful and easy to use. In case you did not yet install this tool just go to https://robomongo.org/download and download the corresponding file for your operating system (please do NOT download the commercial variant named Studio 3T).
After you downloaded the install file and extracted/installed the tool you have to configure the connection to the embedded MongoDB like in the following figure. If you have configured your embedded MongoDB instance to a different port then use that one instead of 40495.
Finally you can navigate your web browser to http://localhost:9091/books then you should see a list of books.
curl 'http://localhost:9091/books' | jqhttp localhost:9091/booksIf both the workshop application and the Robo 3T tool run fine and you could see the list of books then you are setup and ready to start the first lab.
So head over to the next section and start with Lab 1.
6.2. Lab 1: Auto Configuration
We just need to add the following two dependencies to the build.gradle file of the initial application (lab-1/initial-library-server_).
dependencies {
    ...
    implementation('org.springframework.boot:spring-boot-starter-security') (1)
    ...
    testImplementation('org.springframework.security:spring-security-test') (2)
}| 1 | The spring boot starter for spring security |
| 2 | Adds testing support for spring security |
Please start the application by running the class InitialLibraryServerApplication.
6.2.1. Login
Spring Security 5 added a nicer auto-generated login form (build with bootstrap library).
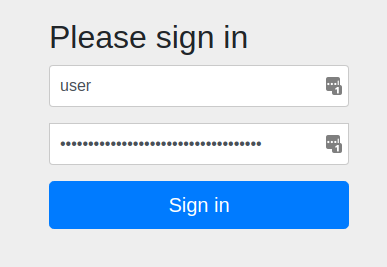
If you browse to localhost:8080/books then you will notice that a login form appears in the browser window.
|
But wait - what are the credentials for a user to log in? With spring security autoconfigured by spring boot the credentials are as follows:
|
INFO 18465 --- [  restartedMain] ctiveUserDetailsServiceAutoConfiguration :

Using default security password: ded10c78-0b2f-4ae8-89fe-c267f9a29e1d
Of course you won’t use the generated password for any serious application as this will change with each restart of the application.
Instead you can easily just change the password to a static value by changing the application.yaml file.
spring:
  ...
  security:
    user:
password: secret|
Please make sure the indents of the content is correct in yaml formatted files. If this is not the case you can get really strange errors sometimes. |
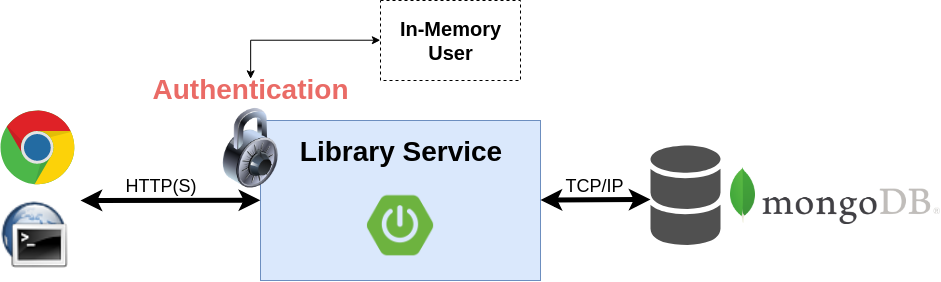
As you can see, if Spring Security is on the classpath, then the web application is secured by default. Spring boot auto-configured basic authentication and form based authentication for all web endpoints.
|
This also applies to all actuator endpoints like /actuator/health. All monitoring web endpoints can now only be accessed with an authenticated user. See Actuator Security for details.
6.2.2. Common Security Problems
Additionally spring security improved the security of the web application automatically for:
-
Session Fixation: Session Fixation is an attack that permits an attacker to hijack a valid user session.
If you want to learn more about this please read the Session Fixation page at OWASP -
Cross Site Request Forgery (CSRF): Cross-Site Request Forgery (CSRF) is an attack that forces an end user to execute unwanted actions on a web application in which they’re currently authenticated.
If you want to know what CSRF really is and how to mitigate this attack please consult CSRF attack description at OWASP -
Default Security Headers: This automatically adds all recommended security response headers to all http responses. You can find more information about this topic in the OWASP Secure Headers Project
Cache-Control: no-cache, no-store, max-age=0, must-revalidate
Expires: 0
Pragma: no-cache
Referrer-Policy: no-referrer
X-Content-Type-Options: nosniff
X-Frame-Options: DENY
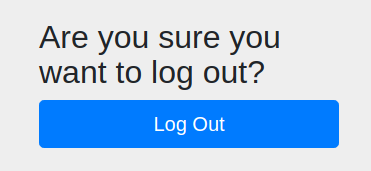
X-XSS-Protection: 1 ; mode=block6.2.3. Logout
Spring security 5 also added a bit more user friendly logout functionality out of the box. If you direct your browser to localhost:8080/logout you will see the following dialog on the screen.
The application already contains a central error handler for the whole web application using @RestControllerAdvice. You can find this in class com.example.library.server.api.ErrorHandler.
To handle potential future access denied error we add the following new block to this class:
import org.springframework.security.access.AccessDeniedException;

@RestControllerAdvice
public class ErrorHandler {

@ExceptionHandler(AccessDeniedException.class)
public Mono<ResponseEntity<String>> handle(AccessDeniedException ex) {
Logger logger = LoggerFactory.getLogger(this.getClass());
logger.error(ex.getMessage());
return Mono.just(ResponseEntity.status(HttpStatus.FORBIDDEN).build());
}
...|
If you try to run the existing tests in package com.example.library.server.api you will notice that these are not green any more. This is due to the security enforcements by Spring Security. |
Now all requests in the tests require an authenticated user and fail with http status 401 (Unauhorized).
All tests using requests with POST, PUT or DELETE methods are failing with http status 403 (Forbidden). These requests are now protected against CSRF attacks and require CSRF tokens.
To achieve authentication in the tests you have to add the annotation @WithMockUser on class level. CSRF is handled by mutating the requests inside the tests by adding this snippet to the failing tests:
...
import static org.springframework.security.test.web.reactive.server.SecurityMockServerConfigurers.csrf;
...
webTestClient
        .mutateWith(csrf())
        ...
This concludes the first step.
|
You find the completed code in project lab-1/complete-library-server. |
Now let’s proceed to next step and start with customizing the authentication part.
6.3. Lab 2: Customize Authentication
The spring boot auto-configuration will back-off a bit in this lab and will back-off completely in next step.

Before we start let’s look into some internal details how spring security works for the reactive web stack.
6.3.1. WebFilter
Like the javax.servlet.Filter in the blocking servlet-based web stack there is a comparable functionality in the reactive world: The WebFilter.
public interface WebFilter {

	/**
	 * Process the Web request and (optionally) delegate to the next
	 * {@code WebFilter} through the given {@link WebFilterChain}.
	 * @param exchange the current server exchange
	 * @param chain provides a way to delegate to the next filter
	 * @return {@code Mono<Void>} to indicate when request processing is complete
	 */
	Mono<Void> filter(ServerWebExchange exchange, WebFilterChain chain);

}
By using the WebFilter you can add functionality that called around each request and response.
Filter |
Description |
AuthenticationWebFilter |
Performs authentication of a particular request |
AuthorizationWebFilter |
Determines if an authenticated user has access to a specific object |
CorsWebFilter |
Handles CORS preflight requests and intercepts |
CsrfWebFilter |
Applies CSRF protection using a synchronizer token pattern. |
To see how such a WebFilter works we will implement a simple LoggingWebFilter:
package com.example.library.server.filter;

import org.slf4j.Logger;
import org.slf4j.LoggerFactory;
import org.springframework.stereotype.Component;
import org.springframework.web.server.ServerWebExchange;
import org.springframework.web.server.WebFilter;
import org.springframework.web.server.WebFilterChain;
import reactor.core.publisher.Mono;

@Component
public class LoggingWebFilter implements WebFilter {

    private static Logger LOGGER = LoggerFactory.getLogger(LoggingWebFilter.class);

    @Override
    public Mono<Void> filter(ServerWebExchange exchange, WebFilterChain chain) {
        LOGGER.info("Request {} called", exchange.getRequest().getPath().value());
        return chain.filter(exchange);
    }
}
6.3.2. WebFilterChainProxy
In lab 1 we just used the auto configuration of Spring Boot. This configured the default security settings as follows:
@Configuration
class WebFluxSecurityConfiguration {
   ...

   /**
	 * The default {@link ServerHttpSecurity} configuration.
	 * @param http
	 * @return
	 */
	private SecurityWebFilterChain springSecurityFilterChain(ServerHttpSecurity http) {
		http
			.authorizeExchange()
				.anyExchange().authenticated();

		if (isOAuth2Present && OAuth2ClasspathGuard.shouldConfigure(this.context)) {
			OAuth2ClasspathGuard.configure(this.context, http);
		} else {
			http
				.httpBasic().and()
				.formLogin();
		}

		SecurityWebFilterChain result = http.build();
		return result;
	}

	...
}
As you can see this uses a SecurityWebFilterChain as central component.
/**
 * Defines a filter chain which is capable of being matched against a {@link ServerWebExchange} in order to decide
 * whether it applies to that request.
 *
 * @author Rob Winch
 * @since 5.0
 */
public interface SecurityWebFilterChain {

	/**
	 * Determines if this {@link SecurityWebFilterChain} matches the provided {@link ServerWebExchange}
	 * @param exchange the {@link ServerWebExchange}
	 * @return true if it matches, else false
	 */
	Mono<Boolean> matches(ServerWebExchange exchange);

	/**
	 * The {@link WebFilter} to use
	 * @return
	 */
	Flux<WebFilter> getWebFilters();
}
To customize the spring security configuration you have to implement one or more of SecurityWebFilterChain configuration methods.
These are handled centrally by the WebFilterChainProxy class.
public class WebFilterChainProxy implements WebFilter {
	private final List<SecurityWebFilterChain> filters;

	public WebFilterChainProxy(List<SecurityWebFilterChain> filters) {
		this.filters = filters;
	}

	public WebFilterChainProxy(SecurityWebFilterChain... filters) {
		this.filters = Arrays.asList(filters);
	}

	@Override
	public Mono<Void> filter(ServerWebExchange exchange, WebFilterChain chain) { (1)
		return Flux.fromIterable(this.filters)
				.filterWhen( securityWebFilterChain -> securityWebFilterChain.matches(exchange))
				.next()
				.switchIfEmpty(chain.filter(exchange).then(Mono.empty()))
				.flatMap( securityWebFilterChain -> securityWebFilterChain.getWebFilters()
					.collectList()
				)
				.map( filters -> new FilteringWebHandler(webHandler -> chain.filter(webHandler), filters))
				.map( handler -> new DefaultWebFilterChain(handler) )
				.flatMap( securedChain -> securedChain.filter(exchange));
	}
}| 1 | Central point for spring security to step into reactive web requests |
6.3.3. Step 1: Encoding Passwords
|
We start by replacing the default user/password with our own persistent user storage (already present in MongoDB). To do this we add a new class WebSecurityConfiguration to package com.example.library.server.config having the following contents.
package com.example.library.server.config;

import org.springframework.context.annotation.Bean;
import org.springframework.security.config.annotation.web.reactive.EnableWebFluxSecurity;
import org.springframework.security.crypto.factory.PasswordEncoderFactories;
import org.springframework.security.crypto.password.PasswordEncoder;

@EnableWebFluxSecurity (1)
public class WebSecurityConfiguration {

    @Bean
    public PasswordEncoder passwordEncoder() {
        return PasswordEncoderFactories.createDelegatingPasswordEncoder(); (2)
    }

}| 1 | This auto-configures the SecurityWebFilterChain |
| 2 | This adds the new delegating password encoder introduced in spring security 5 |
The WebSecurityConfiguration implementation does two important things:
-
This adds the SecurityWebFilterChain. If you already have secured servlet based spring mvc web applications then you might know what’s called the spring security filter chain. In spring webflux the SecurityWebFilterChain is the similar approach based on matching a request with one or more WebFilter.
-
Configures a PasswordEncoder. A password encoder is used by spring security to encode (hash) passwords and to check if a given password matches the encrypted one.
package org.springframework.security.crypto.password;

public interface PasswordEncoder {

	String encode(CharSequence rawPassword); (1)

	boolean matches(CharSequence rawPassword, String encodedPassword); (2)
}| 1 | Encrypts the given cleartext password |
| 2 | Validates the given cleartext password with the encrypted one (without revealing the unencrypted one) |
In spring security 5 creating an instance of the DelegatingPasswordEncoder is much easier by using the class PasswordEncoderFactories. In past years several previously used password encryption algorithms have been broken (like MD4 or MD5). By using PasswordEncoderFactories you always get a configured DelegatingPasswordEncoder instance that configures a map of PasswordEncoder instances for the recommended password hashing algorithms like
At the time of creating this workshop the DelegatingPasswordEncoder instance configures the Bcrypt algorithm as the default to be used for encoding new passwords.
If you want to know more about why to use hashing algorithms like Bcrypt, Scrypt or PBKDF2 instead of other ones like SHA-2 then read the very informative blog post About Secure Password Hashing.
package org.springframework.security.crypto.factory;

public class PasswordEncoderFactories {
    ...
	public static PasswordEncoder createDelegatingPasswordEncoder() {
		String encodingId = "bcrypt"; (1)
		Map<String, PasswordEncoder> encoders = new HashMap<>();
		encoders.put(encodingId, new BCryptPasswordEncoder()); (2)
		encoders.put("ldap", new LdapShaPasswordEncoder());
		encoders.put("MD4", new Md4PasswordEncoder());
		encoders.put("MD5", new MessageDigestPasswordEncoder("MD5"));
		encoders.put("noop", NoOpPasswordEncoder.getInstance());
		encoders.put("pbkdf2", new Pbkdf2PasswordEncoder());
		encoders.put("scrypt", new SCryptPasswordEncoder());
		encoders.put("SHA-1", new MessageDigestPasswordEncoder("SHA-1"));
		encoders.put("SHA-256", new MessageDigestPasswordEncoder("SHA-256"));
		encoders.put("sha256", new StandardPasswordEncoder());

		return new DelegatingPasswordEncoder(encodingId, encoders);
	}
    ...
}| 1 | BCrypt is the default for encrypting passwords |
| 2 | Suitable encoders for decrypting are selected based on prefix in encrypted value |
To have encrypted passwords in our MongoDB store we need to tweak our existing DataInitializer a bit with the PasswordEncoder we just have configured.
package com.example.library.server;
...
import org.springframework.security.crypto.password.PasswordEncoder;
...

@Component
public class DataInitializer implements CommandLineRunner {

    ...
    private final PasswordEncoder passwordEncoder; (1)

    @Autowired
    public DataInitializer(BookRepository bookRepository, UserRepository userRepository,
                            IdGenerator idGenerator, PasswordEncoder passwordEncoder) {
        ...
        this.passwordEncoder = passwordEncoder;
    }

    ...

    private void createUsers() {
        ...
        userRepository
                .save(
                        new User(
                                USER_IDENTIFIER,
                                "bruce.wayne@example.com",
                                passwordEncoder.encode("wayne"), (2)
                                "Bruce",
                                "Wayne",
                                Collections.singletonList(Role.LIBRARY_USER)))
                .subscribe();
        ...
    }
    ...
}| 1 | Inject PasswordEncoder to encrypt user passwords |
| 2 | Change cleartext passwords into encrypted ones (using BCrypt as default) |
6.3.4. Step 2: Persistent User Storage
Now that we already have configured the encoding part for passwords of our user storage we need to connect our own user store (the users already stored in the MongoDB) with spring security’s authentication manager.
This is done in two steps:
In the first step we need to implement spring security’s definition of a user called UserDetails.
package com.example.library.server.security;

import com.example.library.server.dataaccess.User;
import org.springframework.security.core.GrantedAuthority;
import org.springframework.security.core.authority.AuthorityUtils;
import org.springframework.security.core.userdetails.UserDetails;

import java.util.Collection;
import java.util.stream.Collectors;

public class LibraryUser extends User implements UserDetails { (1)

  public LibraryUser(User user) { (2)
    super(user);
  }

  @Override
  public Collection<? extends GrantedAuthority> getAuthorities() {
    return AuthorityUtils.commaSeparatedStringToAuthorityList(
        getRoles().stream().map(rn -> "ROLE_" + rn.name()).collect(Collectors.joining(",")));
  }

  @Override
  public String getUsername() {
    return getEmail();
  }

  @Override
  public boolean isAccountNonExpired() {
    return true;
  }

  @Override
  public boolean isAccountNonLocked() {
    return true;
  }

  @Override
  public boolean isCredentialsNonExpired() {
    return true;
  }

  @Override
  public boolean isEnabled() {
    return true;
  }
}| 1 | To provide our own user store we have to implement the spring security’s predefined interface UserDetails |
| 2 | The implementation for UserDetails is backed up by our existing User model |
In the second step we need to implement spring security’s interface ReactiveUserDetailsService to integrate our user store with the authentication manager.
package com.example.library.server.security;

import com.example.library.server.business.UserService;
import org.springframework.security.core.userdetails.ReactiveUserDetailsService;
import org.springframework.security.core.userdetails.UserDetails;
import org.springframework.stereotype.Service;
import reactor.core.publisher.Mono;

@Service
public class LibraryReactiveUserDetailsService implements ReactiveUserDetailsService { (1)

    private final UserService userService; (2)

    public LibraryReactiveUserDetailsService(UserService userService) {
        this.userService = userService;
    }

    @Override
    public Mono<UserDetails> findByUsername(String username) { (3)
        return userService.findOneByEmail(username).map(LibraryUser::new);
    }
}| 1 | To provide our own user store we have to implement the spring security’s predefined interface ReactiveUserDetailsService which is the binding component between the authentication service and our LibraryUser |
| 2 | To search and load the targeted user for authentication we use our existing UserService |
| 3 | This will be called when authentication happens to get user details for validating the password and adding this user to the security context |
After completing this part of the workshop we now still have the auto-configured SecurityWebFilterChain but we have replaced the default user with our own users from our MongoDB persistent storage.
If you restart the application now you have to use the following user credentials to log in:
Users and roles
There are three target user roles for this application:
-
LIBRARY_USER: Standard library user who can list, borrow and return his currently borrowed books
-
LIBRARY_CURATOR: A curator user who can add, edit or delete books
-
LIBRARY_ADMIN: An administrator user who can list, add or remove users
Important: We will use the following users in all subsequent labs from now on:
Username |
Password |
Roles |
|
bwayne |
wayne |
LIBRARY_USER |
|
bbanner |
banner |
LIBRARY_USER |
|
pparker |
parker |
LIBRARY_CURATOR |
|
ckent |
kent |
LIBRARY_ADMIN |
6.4. Automatic Password Encoding Updates
We already looked into the DelegatingPasswordEncoder and PasswordEncoderFactories. As these classes have knowledge about all encryption algorithms that are supported in spring security, the framework can detect an outdated encryption algorithm. By extending our already existing LibraryReactiveUserDetailsService class with the additionally provided interface ReactiveUserDetailsPasswordService we can now enable an automatic password encryption upgrade mechanism.
The ReactiveUserDetailsPasswordService interface just defines one more operation.
package org.springframework.security.core.userdetails;

import reactor.core.publisher.Mono;

public interface ReactiveUserDetailsPasswordService {

	/**
	 * Modify the specified user's password. This should change the user's password in the
	 * persistent user repository (datbase, LDAP etc).
	 *
	 * @param user the user to modify the password for
	 * @param newPassword the password to change to
	 * @return the updated UserDetails with the new password
	 */
	Mono<UserDetails> updatePassword(UserDetails user, String newPassword);
}
First we need a user having a password that is encoded using an outdated hashing algorithm. We achieve this by modifying the existing DataInitializer class.
package com.example.library.server;

...

import org.springframework.security.crypto.password.DelegatingPasswordEncoder;
import org.springframework.security.crypto.password.MessageDigestPasswordEncoder;

...

/** Store initial users and books in mongodb. */
@Component
public class DataInitializer implements CommandLineRunner {

  ...

  private static final UUID ENCRYPT_UPGRADE_USER_IDENTIFIER =
      UUID.fromString("a7365322-0aac-4602-83b6-380bccb786e2"); (1)

  ...

  private void createUsers() {
    final Logger logger = LoggerFactory.getLogger(this.getClass());

    DelegatingPasswordEncoder oldPasswordEncoder =
        new DelegatingPasswordEncoder(
            "MD5", Collections.singletonMap("MD5", new MessageDigestPasswordEncoder("MD5"))); (2)

    logger.info("Creating users with LIBRARY_USER, LIBRARY_CURATOR and LIBRARY_ADMIN roles...");
    userRepository
        .saveAll(
            Flux.just(
                ...,
                new User(   (3)
                    ENCRYPT_UPGRADE_USER_IDENTIFIER,
                    "old@example.com",
                    oldPasswordEncoder.encode("user"),
                    "Library",
                    "OldEncryption",
                    Collections.singletonList(Role.LIBRARY_USER))))
        .log()
        .then(userRepository.count())
        .subscribe(c -> logger.info("{} users created", c));
  }

  ...
}| 1 | We need an additional user with a password using an old encryption. |
| 2 | To encrypt a user with an outdated password we have to add an additional password encoder for MD5 encryption. Never do such a thing in production. Always use the default PasswordEncoderFactories class instead |
| 3 | Here we add another user with password encrypted by added MD5 password encoder |
To activate support for automatic password encoding upgrades we need to extend our existing LibraryReactiveUserDetailsService class.
package com.example.library.server.security;

import com.example.library.server.business.UserService;
import org.slf4j.Logger;
import org.slf4j.LoggerFactory;
import org.springframework.security.core.userdetails.ReactiveUserDetailsPasswordService;
import org.springframework.security.core.userdetails.ReactiveUserDetailsService;
import org.springframework.security.core.userdetails.UserDetails;
import org.springframework.stereotype.Service;
import reactor.core.publisher.Mono;

@Service
public class LibraryReactiveUserDetailsService implements ReactiveUserDetailsService, ReactiveUserDetailsPasswordService { (1)

    private static final Logger LOGGER = LoggerFactory.getLogger(LibraryReactiveUserDetailsService.class); (2)

    ...

    @Override
    public Mono<UserDetails> updatePassword(UserDetails user, String newPassword) { (3)

        LOGGER.warn("Password upgrade for user with name '{}'", user.getUsername());

        // Only for demo purposes. NEVER log passwords in production!!!
        LOGGER.info("Password upgraded from '{}' to '{}'", user.getPassword(), newPassword);

        return userService.findOneByEmail(user.getUsername())
                .doOnSuccess(u -> u.setPassword(newPassword))
                .flatMap(userService::update)
                .map(LibraryUser::new);
    }
}| 1 | To provide our own user store we have to implement the spring security’s predefined interface ReactiveUserDetailsService which is the binding component between the authentication service and our LibraryUser. Now we also add ReactiveUserDetailsPasswordService to enable automatic password encryption upgrades |
| 2 | To log the password upgrade action here we provide a logger. Please note: NEVER log passwords in production!! |
| 3 | This operation is called automatically by spring security if it detects a password that is encrypted using an outdated encryption algorithm like MD5 message digest |
Now restart the application and see what happens if we try to get the list of books using this new user (username='old@example.com', password='user').
In the console you should see the log output showing the old MD5 password being updated to Bcrypt password.
|
Never log any sensitive data like passwords, tokens etc., even in hashed format. Also never put such sensitive data into your version control. And never let error details reach the client (via REST API or web application). Make sure you disable stacktraces in client error messages using property server.error.include-stacktrace=never |
This is the end of lab 2 of the workshop.
|
You find the completed code in project lab-2/complete-library-server. |
In the next workshop part we also adapt the SecurityWebFilterChain to our needs and add authorization rules (in web and method layer) for our application.
6.5. Lab 3: Add Authorization
As a result of the previous workshop steps we now have authentication for all our web endpoints (including the actuator endpoints) and we can log in using our own users. But here security does not stop.
We know who is using our application (authentication) but we do not have control over what this user is allowed to do in our application (authorization).
|
As a best practice the authorization should always be implemented on different layers like the web and method layer. This way the authorization still prohibits access even if a user manages to bypass the web url based authorization filter by playing around with manipulated URL’s.
Our required authorization rule matrix looks like this:
URL |
Http method |
Restricted |
Roles with access |
/.css,/.jpg,/*.ico,… |
All |
No |
— |
/books/{bookId}/borrow |
POST |
Yes |
LIBRARY_USER |
/books/{bookId}/return |
POST |
Yes |
LIBRARY_USER |
/books |
POST |
Yes |
LIBRARY_CURATOR |
/books |
DELETE |
Yes |
LIBRARY_CURATOR |
/users |
All |
Yes |
LIBRARY_ADMIN |
/actuator/health |
GET |
No |
— |
/actuator/info |
GET |
No |
— |
/actuator/* |
GET |
Yes |
LIBRARY_ADMIN |
/* |
All |
Yes |
All authenticated ones |
All the web layer authorization rules are configured in the WebSecurityConfiguration class by adding a new bean for SecurityWebFilterChain. Here we also already switch on the support for method layer authorization by adding the annotation @EnableReactiveMethodSecurity.
package com.example.library.server.config;

...

@EnableWebFluxSecurity
@EnableReactiveMethodSecurity (1)
public class WebSecurityConfiguration {

    @Bean (2)
    public SecurityWebFilterChain springSecurityFilterChain(ServerHttpSecurity http) {
        return http
            .authorizeExchange()
                .matchers(PathRequest.toStaticResources().atCommonLocations())
                .permitAll() (3)
                .matchers(EndpointRequest.to("health"))
                .permitAll() (4)
                .matchers(EndpointRequest.to("info"))
                .permitAll()
                .matchers(EndpointRequest.toAnyEndpoint())
                .hasRole(Role.LIBRARY_ADMIN.name()) (5)
                .pathMatchers(HttpMethod.POST, "/books/{bookId}/borrow")
                .hasRole(Role.LIBRARY_USER.name())
                .pathMatchers(HttpMethod.POST, "/books/{bookId}/return")
                .hasRole(Role.LIBRARY_USER.name()) (6)
                .pathMatchers(HttpMethod.POST, "/books")
                .hasRole(Role.LIBRARY_CURATOR.name()) (7)
                .pathMatchers(HttpMethod.DELETE, "/books")
                .hasRole(Role.LIBRARY_CURATOR.name())
                .pathMatchers("/users/**")
                .hasRole(Role.LIBRARY_ADMIN.name()) (8)
                .anyExchange()
                .authenticated() (9)
                .and()
                .httpBasic()
                .and()
                .formLogin() (10)
                .and()
                .logout()
                .logoutSuccessHandler(logoutSuccessHandler()) (11)
                .and()
                .build();
    }

    @Bean (12)
    public ServerLogoutSuccessHandler logoutSuccessHandler() {
        RedirectServerLogoutSuccessHandler logoutSuccessHandler = new RedirectServerLogoutSuccessHandler();
        logoutSuccessHandler.setLogoutSuccessUrl(URI.create("/books"));
        return logoutSuccessHandler;
    }

    @Bean
    public PasswordEncoder passwordEncoder() {
        return PasswordEncoderFactories.createDelegatingPasswordEncoder();
    }

}| 1 | This adds support for method level authorization |
| 2 | Configures authentication and web layer authorization for all URL’s of our REST api |
| 3 | All static resources (favicon.ico, css, images, …) can be accessed without authentication |
| 4 | Actuator endpoints for health and info can be accessed without authentication |
| 5 | All other actuator endpoints require authentication |
| 6 | Borrow or returning books require authenticated user having the 'LIBRARY_USER' role |
| 7 | Modifying access to books require authenticated user having the 'LIBRARY_CURATOR' role |
| 8 | Access to users require authenticated user having the 'LIBRARY_ADMIN' role |
| 9 | All other web endpoints require authentication |
| 10 | Authentication can be performed using basic authentication or form based login |
| 11 | After logging out it redirects to URL configured in the logout success handler |
| 12 | The configured login success handler redirects to /books resource |
We also add a a ServerLogoutSuccessHandler bean to redirect back to the /books endpoint after a logout to omit the error message we got so far by redirecting to a non-existing page.
We continue with authorization on the method layer by adding the rules to our business service classes BookService and UserService. To achieve this we use the @PreAuthorize annotations provided by spring security. Same as other spring annotations (e.g. @Transactional) you can put @PreAuthorize annotations on global class level or on method level.
Depending on your authorization model you may use @PreAuthorize to authorize using static roles or to authorize using dynamic expressions (usually if you have roles with permissions).
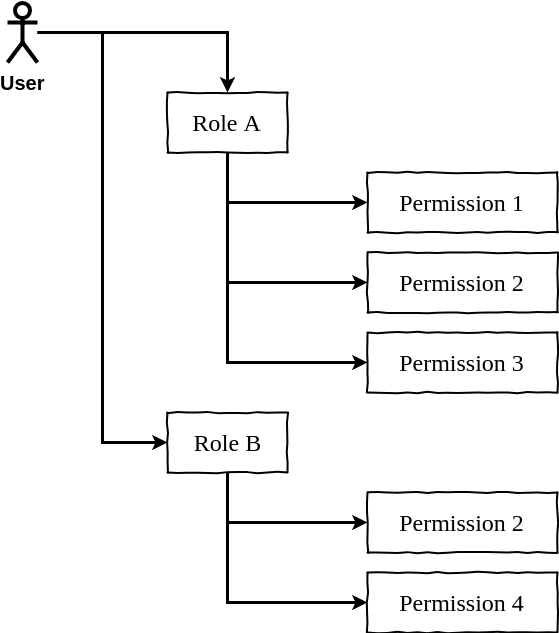
If you want to have a permission based authorization you can use the predefined interface PermissionEvaluator inside the @PreAuthorize annotations like this:
class MyService {
    @PreAuthorize("hasPermission(#uuid, 'user', 'write')")
    void myOperation(UUID uuid) {...}
}package org.springframework.security.access;
...
public interface PermissionEvaluator extends AopInfrastructureBean {
boolean hasPermission(Authentication authentication, Object targetDomainObject,
Object permission);
boolean hasPermission(Authentication authentication, Serializable targetId,
String targetType, Object permission);
}In the workshop due to time constraints we have to keep things simple so we just use static roles.
Here it is done for the all operations of the book service.
package com.example.library.server.business;

...
import org.springframework.security.access.prepost.PreAuthorize;
...

@Service
@PreAuthorize("hasAnyRole('LIBRARY_USER', 'LIBRARY_CURATOR')") (1)
public class BookService {

    ...

    @PreAuthorize("hasRole('LIBRARY_CURATOR')") (2)
    public Mono<Void> create(Mono<BookResource> bookResource) {
        return bookRepository.insert(bookResource.map(this::convert)).then();
    }

    ...

    @PreAuthorize("hasRole('LIBRARY_CURATOR')") (3)
    public Mono<Void> deleteById(UUID uuid) {
        return bookRepository.deleteById(uuid).then();
    }
    ...

    @PreAuthorize("hasRole('LIBRARY_USER')") (4)
      public Mono<Void> borrowById(UUID bookIdentifier, UUID userIdentifier) {
      ...
    }
    ...

    @PreAuthorize("hasRole('LIBRARY_USER')") (5)
      public Mono<Void> returnById(UUID bookIdentifier, UUID userIdentifier) {
      ...
    }
}| 1 | In general all users (having either of these 2 roles) can access RESTful services for books |
| 2 | Only users having role 'LIBRARY_CURATOR' can access this RESTful service to create books |
| 3 | Only users having role 'LIBRARY_CURATOR' can access this RESTful service to delete books |
| 4 | Only users having role 'LIBRARY_USER' can access this RESTful service to borrow books |
| 5 | Only users having role 'LIBRARY_USER' can access this RESTful service to return books |
And now we add it the same way for the all operations of the user service.
package com.example.library.server.business;
...
import org.springframework.security.access.prepost.PreAuthorize;
...
@Service
@PreAuthorize("hasRole('LIBRARY_ADMIN')") (1)
public class UserService {

    ...

    @PreAuthorize("isAnonymous() or isAuthenticated()") (2)
    public Mono<UserResource> findOneByEmail(String email) {
        return userRepository.findOneByEmail(email).map(this::convert);
    }

    ...
}| 1 | In general only users having role 'LIBRARY_ADMIN' can access RESTful services for users |
| 2 | As this operation is used by the LibraryUserDetailsService to perform authentication this has to be accessible for anonymous users (unless authentication is finished successfully anonymous users are unauthenticated users) |
Now that we have the current user context available in our application we can use this to automatically set this user as the one who has borrowed a book or returns his borrowed book. The current user can always be evaluated using the ReactiveSecurityContextHolder class. But a more elegant way is to just let the framework put the current user directly into our operation via @AuthenticationPrincipal annotation.
package com.example.library.server.api;

import org.springframework.security.core.annotation.AuthenticationPrincipal;

@RestController
public class BookRestController {

    ...

    @PostMapping("/books/" + PATH_BOOK_ID + "/borrow")
    public Mono<Void> borrowBookById(
            @PathVariable(PATH_VARIABLE_BOOK_ID) UUID bookId, @AuthenticationPrincipal LibraryUser user) { (1)
        return bookService.borrowById(bookId, user != null ? user.getId() : null);
    }

    @PostMapping("/books/" + PATH_BOOK_ID + "/return")
    public Mono<Void> returnBookById(@PathVariable(
            PATH_VARIABLE_BOOK_ID) UUID bookId, @AuthenticationPrincipal LibraryUser user) { (2)
        return bookService.returnById(bookId, user != null ? user.getId() : null);
    }

    ...
}| 1 | Now that we have an authenticated user context we can add the current user as the one to borrow a book |
| 2 | Now that we have an authenticated user context we can add the current user as the one to return his borrowed a book |
So please go ahead and re-start the application and try to borrow a book with an authenticated user.
http localhost:9091/books --auth 'bruce.wayne@example.com:wayne'http POST localhost:9091/books/{bookId}/borrow --auth 'bruce.wayne@example.com:wayne'Note: Replace {bookId} with the id of one of the books you have got in the list of books.
curl 'http://localhost:8080/books' -i -X GET \
    -H 'Accept: application/json' -u bruce.wayne@example.com:wayne | jq
curl 'http://localhost:8080/books/{bookId}/borrow' -i -X POST \
-H 'Accept: application/json' -u bruce.wayne@example.com:wayne | jqNote: Replace {bookId} with the id of one of the books you have got in the list of books.
At first you will notice that even with the correct basic authentication header you get an error message like this one:
POST http://localhost:8080/books

HTTP/1.1 403 Forbidden
transfer-encoding: chunked
Content-Type: text/plain
Cache-Control: no-cache, no-store, max-age=0, must-revalidate
Pragma: no-cache
Expires: 0
X-Content-Type-Options: nosniff
X-Frame-Options: DENY
X-XSS-Protection: 1 ; mode=block

No CSRF Token has been associated to this client

Response code: 403 (Forbidden)
The library-server expects a CSRF token in the request but did not find one. If you use common UI frameworks like Thymeleaf or JSF (on the serverside) or a clientside one like Angular then these already handle this CSRF processing.
In our case we do not have such handler. To successfully tra the borrow book request you have to switch off
CSRF in the library server.
This is done like this in the WebSecurityConfiguration class.
...
@Bean
public SecurityWebFilterChain springSecurityFilterChain(ServerHttpSecurity http) {
    return http
        .csrf().disable() (1)
        .authorizeExchange()
        .matchers(PathRequest.toStaticResources().atCommonLocations()).permitAll()
...| 1 | Add this line to disable CSRF. |
Restart the application and retry to borrow a book. This time the request should be successful.
|
Do not disable CSRF on productive servers if you use session cookies, otherwise you are vulnerable to CSRF attacks. You may safely disable CSRF for servers that use a stateless authentication approach with bearer tokens like for OAuth2 or OpenID Connect. |
In this workshop step we added the authorization to web and method layers. So now for particular RESTful endpoints access is only permitted to users with special roles.
|
You find the completed code in project lab-3/complete-library-server. |
But how do you know that you have implemented all the authorization rules and did not leave a big security leak for your RESTful API? Or you may change some authorizations later by accident?
To be on a safer side here you need automatic testing. Yes, this can also be done for security! We will see how this works in the next workshop part.
6.6. Lab 4: Security Testing
We start testing the rules on method layer for all operations regarding books.

The tests will be implemented using the new JUnit 5 version as Spring 5.0 now supports this as well.
In BookServiceTest class we also use the new convenience annotation @SpringJUnitConfig which is a shortcut of
@ExtendWith(value=SpringExtension.class) and @ContextConfiguration.
As you can see in the following code only a small part is shown as a sample here to test the BookService.create() operation. Authorization should always be tested for positive AND negative test cases. Otherwise you probably miss an authorization constraint. Depending on the time left in the workshop you can add some more test cases as you like or just look into the completed application 04-library-server.
package com.example.library.server.business;

...

@DisplayName("Verify that book service")
@SpringJUnitConfig(InitialServerApplication.class) (1)
class BookServiceAuthorizationTest {

  @Autowired private BookService bookService;

  @MockBean private BookRepository bookRepository; (2)

  @MockBean private UserRepository userRepository;

  @DisplayName("grants access to create a book for role 'LIBRARY_CURATOR'")
  @Test
  @WithMockUser(roles = "LIBRARY_CURATOR")
  void verifyCreateAccessIsGrantedForCurator() { (3)
    when(bookRepository.insert(Mockito.<Mono<Book>>any())).thenReturn(Flux.just(new Book()));
    StepVerifier.create(
            bookService.create(
                Mono.just(
                    new Book(
                        UUID.randomUUID(),
                        "123456789",
                        "title",
                        "description",
                        Collections.singletonList("author"),
                        false,
                        null))))
        .verifyComplete();
  }

  @DisplayName("denies access to create a book for roles 'LIBRARY_USER' and 'LIBRARY_ADMIN'")
  @Test
  @WithMockUser(roles = {"LIBRARY_USER", "LIBRARY_ADMIN"})
  void verifyCreateAccessIsDeniedForUserAndAdmin() { (4)
    StepVerifier.create(
            bookService.create(
                Mono.just(
                    new Book(
                        UUID.randomUUID(),
                        "123456789",
                        "title",
                        "description",
                        Collections.singletonList("author"),
                        false,
                        null))))
        .verifyError(AccessDeniedException.class);
  }

  @DisplayName("denies access to create a book for anonymous user")
  @Test
  void verifyCreateAccessIsDeniedForUnauthenticated() { (5)
    StepVerifier.create(
            bookService.create(
                Mono.just(
                    new Book(
                        UUID.randomUUID(),
                        "123456789",
                        "title",
                        "description",
                        Collections.singletonList("author"),
                        false,
                        null))))
        .verifyError(AccessDeniedException.class);
  }

  ...

}| 1 | As this is a JUnit 5 based integration test we use @SpringJUnitConfig to add spring JUnit 5 extension and configure the application context |
| 2 | All data access (the repositories) is mocked |
| 3 | Positive test case of access control for creating books with role 'LIBRARY_CURATOR' |
| 4 | Negative test case of access control for creating books with roles 'LIBRARY_USER' or 'LIBRARY_ADMIN' |
| 5 | Negative test case of access control for creating books with anonymous user |
For sure you have to add similar tests as well for the user part.
package com.example.library.server.business;

...

@DisplayName("Verify that user service")
@SpringJUnitConfig(InitialServerApplication.class) (1)
class UserServiceAuthorizationTest {

  @Autowired
  private UserService userService;

  @MockBean
  private UserRepository userRepository;

  @DisplayName("grants access to find one user by email for anonymous user")
  @Test
  void verifyFindOneByEmailAccessIsGrantedForUnauthenticated() { (2)
    when(userRepository.findOneByEmail(any()))
        .thenReturn(
            Mono.just(
                new User(
                    UUID.randomUUID(),
                    "test@example.com",
                    "secret",
                    "Max",
                    "Maier",
                    Collections.singletonList(Role.LIBRARY_USER))));
    StepVerifier.create(userService.findOneByEmail("test@example.com"))
        .expectNextCount(1)
        .verifyComplete();
  }

  @DisplayName("grants access to find one user by email for roles 'LIBRARY_USER', 'LIBRARY_CURATOR' and 'LIBRARY_ADMIN'")
  @Test
  @WithMockUser(roles = {"LIBRARY_USER", "LIBRARY_CURATOR", "LIBRARY_ADMIN"})
  void verifyFindOneByEmailAccessIsGrantedForAllRoles() { (3)
    when(userRepository.findOneByEmail(any()))
        .thenReturn(
            Mono.just(
                new User(
                    UUID.randomUUID(),
                    "test@example.com",
                    "secret",
                    "Max",
                    "Maier",
                    Collections.singletonList(Role.LIBRARY_USER))));
    StepVerifier.create(userService.findOneByEmail("test@example.com"))
        .expectNextCount(1)
        .verifyComplete();
  }

  ...

  @DisplayName("denies access to create a user for roles 'LIBRARY_USER' and 'LIBRARY_CURATOR'")
  @Test
  @WithMockUser(roles = {"LIBRARY_USER", "LIBRARY_CURATOR"})
  void verifyCreateAccessIsDeniedForUserAndCurator() { (4)
    StepVerifier.create(
            userService.create(
                Mono.just(
                    new User(
                        UUID.randomUUID(),
                        "test@example.com",
                        "secret",
                        "Max",
                        "Maier",
                        Collections.singletonList(Role.LIBRARY_USER)))))
        .verifyError(AccessDeniedException.class);
  }
  ...
}| 1 | As this is a JUnit 5 based integration test we use @SpringJUnitConfig to add spring JUnit 5 extension and configure the application context |
| 2 | Positive test case of access control for finding a user by email for anonymous user |
| 3 | Positive test case of access control for finding a user by email with all possible roles |
| 4 | Negative test case of access control for creating user with roles 'LIBRARY_USER' or 'LIBRARY_CURATOR' |
|
Make sure you always add positive and negative authorization tests. Otherwise you may miss authorization endpoint leaks. |
Another approach is to test the authentication for the reactive api. This is shown in following class.
package com.example.library.server.api;

@ExtendWith(SpringExtension.class)
@SpringBootTest(classes = BookApiAuthenticationTest.TestConfig.class) (1)
@DisplayName("Access to book api")
class BookApiAuthenticationTest {

  @Autowired private ApplicationContext applicationContext;

  private WebTestClient webTestClient;

  @MockBean private BookService bookService;
  @MockBean private UserRepository userRepository;

  @BeforeEach
  void setUp() {
    this.webTestClient =
        WebTestClient.bindToApplicationContext(applicationContext)
            .apply(springSecurity()) (2)
            .configureClient()
            .build();
  }

  @ComponentScan(
      basePackages = {
        "com.example.library.server.api",
        "com.example.library.server.business",
        "com.example.library.server.config"
      })
  @EnableWebFlux
  @EnableWebFluxSecurity
  @EnableAutoConfiguration( (3)
      exclude = {
        MongoReactiveAutoConfiguration.class,
        MongoAutoConfiguration.class,
        MongoDataAutoConfiguration.class,
        EmbeddedMongoAutoConfiguration.class,
        MongoReactiveRepositoriesAutoConfiguration.class,
        MongoRepositoriesAutoConfiguration.class
      })
  static class TestConfig {}

  @DisplayName("as authenticated user is granted")
  @Nested
  class AuthenticatedBookApi {

    @WithMockUser (4)
    @Test
    @DisplayName("to get list of books")
    void verifyGetBooksAuthenticated() {

      given(bookService.findAll()).willReturn(Flux.just(BookBuilder.book().build()));

      webTestClient
          .get()
          .uri("/books")
          .accept(MediaType.APPLICATION_JSON)
          .exchange()
          .expectStatus()
          .isOk()
          .expectHeader() (5)
          .exists("X-XSS-Protection")
          .expectHeader()
          .valueEquals("X-Frame-Options", "DENY");
    }

    @Test
    @DisplayName("to get single book")
    void verifyGetBookAuthenticated() {

      UUID bookId = UUID.randomUUID();

      given(bookService.findById(bookId))
          .willReturn(Mono.just(BookBuilder.book().withId(bookId).build()));

      webTestClient
          .mutateWith(mockUser()) (6)
          .get()
          .uri("/books/{bookId}", bookId)
          .accept(MediaType.APPLICATION_JSON)
          .exchange()
          .expectStatus()
          .isOk();
    }

    ...
  }

  @DisplayName("as unauthenticated user is denied with 401")
  @Nested
  class UnAuthenticatedBookApi {

    @Test
    @DisplayName("to get list of books")
    void verifyGetBooksUnAuthenticated() {

      webTestClient
          .get()
          .uri("/books")
          .accept(MediaType.APPLICATION_JSON)
          .exchange()
          .expectStatus()
          .isUnauthorized(); (7)
    }

    ...
}| 1 | Custom test configuration |
| 2 | Sets up Spring Security’s WebTestClient test support |
| 3 | Exclude complete persistence layer from test (out of scope for authentication) |
| 4 | Specify user authentication |
| 5 | Verify existence of expected security response headers |
| 6 | Alternative way to specify user authentication |
| 7 | Negative test case to verify unauthenticated user is not authorized to use the api |
The testing part is the last part of adding simple username/password based security to the reactive style of the library-server project. The next step will dive into the world of token-based authentication.
|
You find the completed code in project lab-4/complete-library-server. |
7. OAuth2/OpenID Connect Labs
7.1. Introduction
7.1.1. OAuth 2.0
OAuth 2.0 is the base protocol for authorizing 3rd party authentication services for using business services in the internet like stackoverflow.
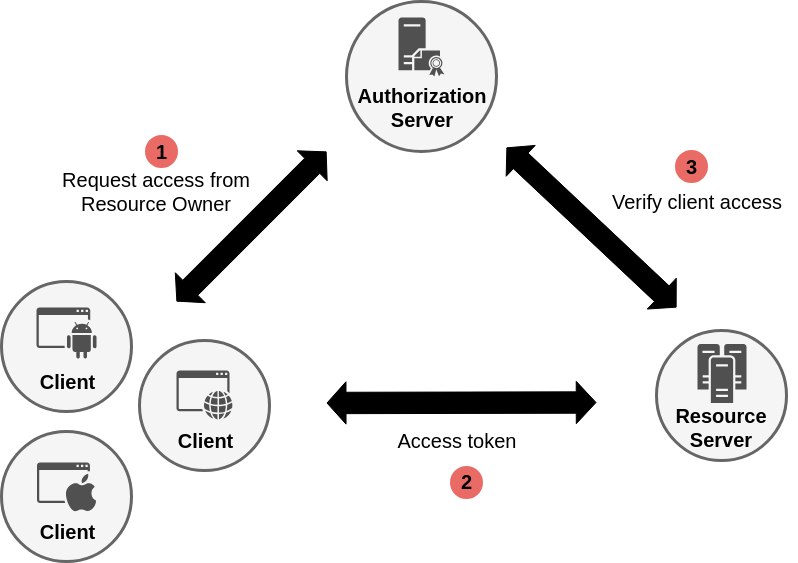
Authorizations are permitted via scopes that the user has to confirm before using the requested service.
Depending on the application type OAuth 2.0 provides the following grants (flows):
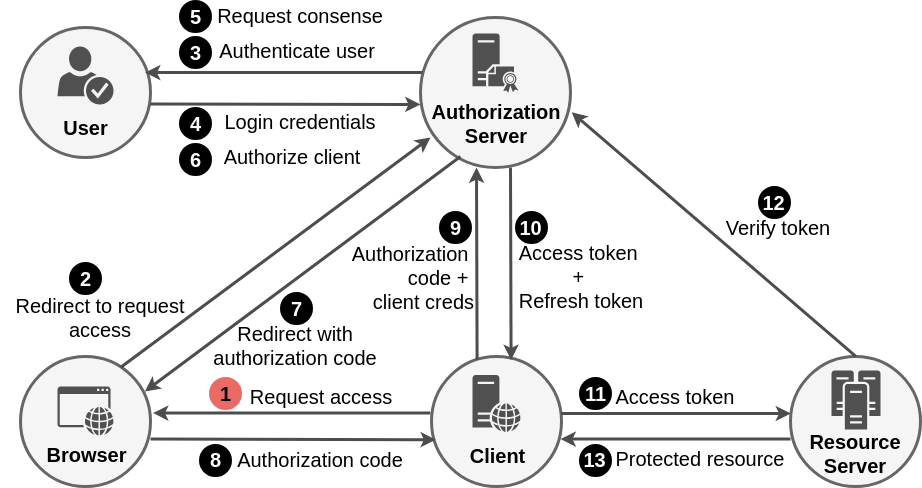
The following picture shows the mechanics of the Authorization Code Grant Flow.
7.1.2. OpenID Connect 1.0 (OIDC)
OpenID Connect 1.0 (OIDC) is build upon OAuth2 and provides additional identity information to OAuth2. For common enterprise applications that typically require authentication OpenID Connect should be used. OIDC adds JSON web tokens (JWT) as mandatory format for id tokens to the spec. In OAuth2 the format of bearer tokens is not specified.
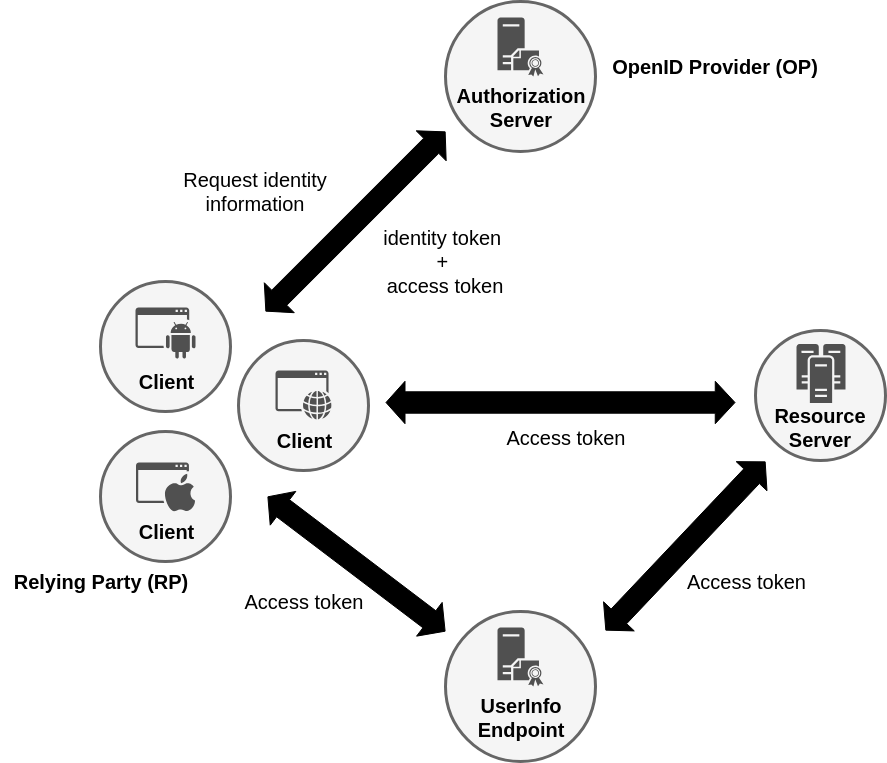
OIDC adds an id token in addition to the access token of OAuth2 and specifies a user info endpoint to retrieve further user information using the access token.
OIDC supports the following grant flows:
7.1.3. Tokens in OIDC and OAuth 2.0
Tokens can be used in two ways:
-
Self-contained token (containing all information directly in token payload, e.g. JWT)
-
Reference token (token is used to look up further information)
7.1.4. OAuth2/OIDC in Spring Security 5
In short Spring Security 5.0 adds a completely rewritten implementation for OAuth2/OIDC which now is largely based on a third party library Nimbus OAuth 2.0 SDK instead of implementing all these functionality directly in Spring itself.
Spring Security 5.0 only provides the client side for servlet-based clients.
Spring Security 5.1 adds the resource server support and reactive support for reactive clients and resource server as well.
Spring Security 5.2 adds client support for authorization code flow with PKCE.
Spring Security 5.3 will add a basic OAuth2/OIDC authorization server again (for local dev and demos but not for productive use).
Before Spring Security 5.0 and Spring Boot 2.0 to implement OAuth2 you needed the separate project module Spring Security OAuth2.
Now things have changed much, so it heavily depends now on the combination of Spring Security and Spring Boot versions that are used how to implement OAuth2/OIDC.
Therefore you have to be aware of different approaches for Spring Security 4.x/Spring Boot 1.5.x and Spring Security 5.x/Spring Boot 2.x.
Spring Security |
Spring Boot |
Client |
Resource server |
Authorization server |
Reactive (WebFlux) |
4.x |
1.5.x |
X1 |
X1 |
X1 |
— |
5.0 |
2.0.x |
X2 |
(X)3 |
(X)3 |
— |
5.1 |
2.1.2 |
X2 |
X4 |
(X)3 |
X5 |
5.2 |
2.2.0 |
X2 |
X4 |
(X)3 |
X5 |
5.3 |
2.3.0 |
X2 |
X4 |
X6 |
X5 |
1 Spring Boot auto-config and separate Spring Security OAuth project
2 New rewritten OAuth2 login client included in Spring Security 5.0
3 No direct support in Spring Security 5.0/Spring Boot 2.0. For auto-configuration with Spring Boot 2.0
you still have to use the separate Spring Security OAuth project
together with Spring Security OAuth2 Boot compatibilty project
4 New refactored support for resource server as part of Spring Security 5.1
5 OAuth2 login client and resource server with reactive support as part of Spring Security 5.1.
6 New OAuth2 authorization server is planned as part of Spring Security 5.2
|
The OAuth2/OpenID Connect Authorization Server provided by Spring Security 5.3 will mainly suit for fast prototyping and demo purposes. For production please use one of the officially certified products like for example KeyCloak, UAA, IdentityServer, Auth0 or Okta. |
You can find more information on building OAuth2 secured microservices with Spring Boot 1.5.x in
You can find more information on building OAuth2 secured microservices with Spring Boot 2.1 and Spring Security 5.1 in
In this workshop we will now look at what Spring Security 5.1 provides as new OAuth2/OIDC Login Client and Resource Server - In a reactive way.
7.1.5. What we will build
In lab-5 you will be provided the following sub-projects:
-
initial-resource-server: The initial library server (almost similar to workshop step lab-1/initial-library-server)
-
complete-resource-server: The completed OIDC resource server (as reference)
In lab-6 you will be provided the following sub-projects:
-
initial-oidc-client: Initial code for this workshop part to implement the new OAuth2 Login Client
-
complete-oidc-client: Complete code of the new OIDC Client (as reference)
|
The spring implementation of the authorization server previously used (based on Spring Boot 1.5.x) is not fully compliant with OIDC and therefore not usable any more with OAuth2/OIDC implementation of Spring Security 5.1. |
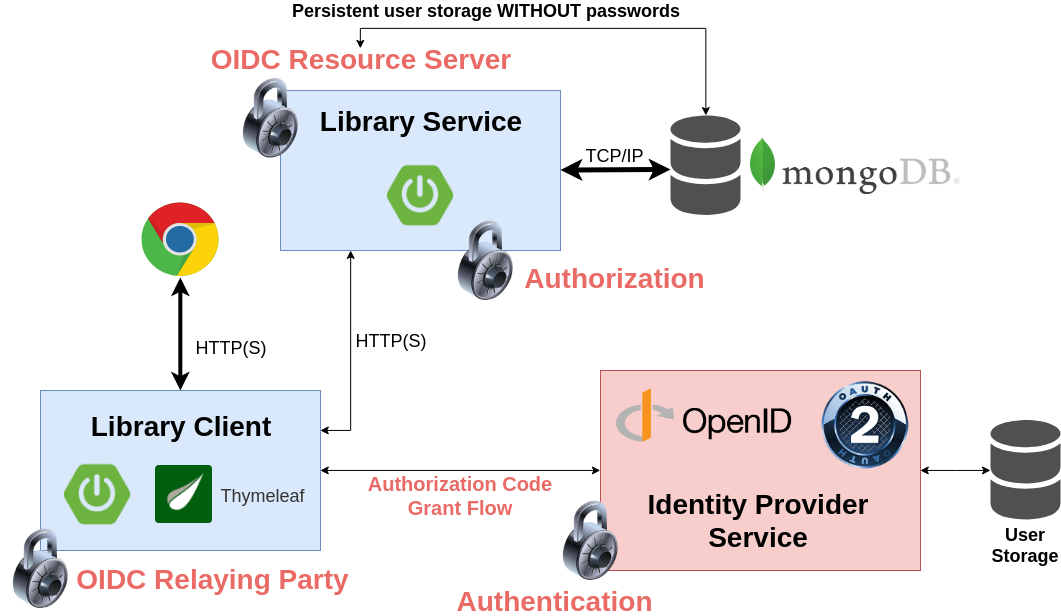
These micro-services have to be configured to be reachable via the following URL addresses (Port 8080 is the default port in spring boot).
Service |
URL |
Identity Management Service (Keycloak) |
|
Library Client (OIDC Client) |
|
Library Server (OIDC Resource Server) |
So now let’s start. Again, you will just use the provided keycloak identity management server, the lab-5/initial-resource-server and the lab-6/initial-oidc-client as starting point and implement an OAuth2/OIDC resource server and client based on the project.
But first read important information about how to setup and start the required keycloak identity management server.
7.2. Setup: Keycloak Identity Server
For this workshop the OpenID Connect certified Keycloak identity provider server is used. This provider supports solutions for authentication, authorization and user administration. For our purposes we will use this service to issue OpenID Connect compliant JSON web tokens (JWT).
To setup the local keycloak server please copy/extract it from provided USB sticks or follow the setup instructions at https://tinyurl.com/y2mqyeua.
|
You may look into OpenID Connect certified products to find a suitable identity management server for your project. |
Every OpenID Connect 1.0 compliant identity server must provide a page at the endpoint /…/.well-known/openid-configuration
To see the configuration please open the following url in your web browser: Well known OIDC configuration
The important information provided by this is:
Entry |
Description |
Value |
issuer |
Issuer url for issued tokens by this identity server |
|
authorization_endpoint |
Handles authorization, usually asking for credentials and returns an authorization code |
http://localhost:8080/auth/realms/workshop/protocol/openid-connect/auth |
token_endpoint |
Token endpoint (exchanges given authorization code for access token) |
http://localhost:8080/auth/realms/workshop/protocol/openid-connect/token |
userinfo_endpoint |
Endpoint for requesting further user information |
http://localhost:8080/auth/realms/workshop/protocol/openid-connect/userinfo |
jwks_uri |
Uri for loading public keys to verify signatures of JSON web tokens |
http://localhost:8080/auth/realms/workshop/protocol/openid-connect/certs |
To login into your local keycloak use the following user credentials:
-
Username: admin
-
Password: admin
The keycloak identity service has been preconfigured with the following user credentials for the workshop application:
Username |
Password |
Roles |
|
bwayne |
wayne |
LIBRARY_USER |
|
bbanner |
banner |
LIBRARY_USER |
|
pparker |
parker |
LIBRARY_CURATOR |
|
ckent |
kent |
LIBRARY_ADMIN |
7.3. Intro-Lab: Authorization Code Demo Client
In this introduction lab you can see the authorization code grant flow step-by-step in detail.
Please make sure that you have started keycloak server. Then check this out, go to project intro-labs/auth-code-demo and run the class com.example.authorizationcode.client.AuthorizationCodeDemo.
7.4. Lab 5: OpenID Connect Resource Server
For this workshop part the well-known library-server application is used and will be extended to act as a OAuth2 resource server.
7.4.1. Gradle dependencies
To use the new OAuth2 resource server support of Spring Security 5.1 you have to add the following required dependencies to the existing gradle build file.
dependencies {
    ...
    implementation('org.springframework.boot:spring-boot-starter-oauth2-resource-server') (1)
    testImplementation('org.springframework.security:spring-security-test') (2)
	...
}| 1 | This contains all code to build an OAuth 2.0/OIDC resource server (incl. support for JOSE (Javascript Object Signing and Encryption) |
| 2 | Testing support for spring security |
|
These dependencies already have been added to the initial project. |
|
You may look into the spring security oauth2 boot reference documentation Spring Boot 2.1 Reference Documentation and the Spring Security 5.1 Reference Documentation on how to implement a resource server. |
7.4.2. Implementation steps
First step is to configure an OAuth2 resource server. For this you have to register the corresponding identity server/authorization server to use.
Spring security 5 uses the [OpenID Connect Discovery](https://openid.net/specs/openid-connect-discovery-1_0.html#ProviderConfig) specification to completely configure the resource server to use our keycloak instance.
Navigate your web browser to the url [localhost:8080/auth/realms/workshop/.well-known/openid-configuration](http://localhost:8080/auth/realms/workshop/.well-known/openid-configuration). Then you should see the public discovery information that keycloak provides (like the following that only shows partial information).
{
  "issuer": "http://localhost:8080/auth/realms/workshop",
  "authorization_endpoint": "http://localhost:8080/auth/realms/workshop/protocol/openid-connect/auth",
  "token_endpoint": "http://localhost:8080/auth/realms/workshop/protocol/openid-connect/token",
  "userinfo_endpoint": "http://localhost:8080/auth/realms/workshop/protocol/openid-connect/userinfo",
  "jwks_uri": "http://localhost:8080/auth/realms/workshop/protocol/openid-connect/certs"
}
For configuring a resource server the important entries are issuer and jwks_uri. Spring Security 5 automatically configures a resource server by just specifying the issuer uri value as part of the predefined spring property spring.security.oauth2.resourceserver.jwt.issuer-uri
spring:
  security:
    oauth2:
      resourceserver:
        jwt:
issuer-uri: http://localhost:8080/auth/realms/workshop (1)| 1 | The issuer url is used to look up the well known configuration page to get all required configuration settings to set up a resource server |
|
An error you get very often with files in yaml format is that the indents are not correct. This can lead to unexpected errors later when you try to run all this stuff. |
With this configuration in place we have already a working resource server that can handle JWt access tokens transmitted via http bearer token header. Spring Security also validates by default:
-
the JWT signature against the queried public key(s) from jwks_url
-
the JWT iss claim against the configured issuer uri
-
that the JWT is not expired
The issuer URI is used to retrieve the well known OpenID Connect configuration.
{
  "issuer": "http://localhost:8080/auth/realms/workshop",
  "authorization_endpoint": "http://localhost:8080/auth/realms/workshop/protocol/openid-connect/auth",
  "token_endpoint": "http://localhost:8080/auth/realms/workshop/protocol/openid-connect/token",
  "token_introspection_endpoint": "http://localhost:8080/auth/realms/workshop/protocol/openid-connect/token/introspect",
  "userinfo_endpoint": "http://localhost:8080/auth/realms/workshop/protocol/openid-connect/userinfo",
  "end_session_endpoint": "http://localhost:8080/auth/realms/workshop/protocol/openid-connect/logout",
  "jwks_uri": "http://localhost:8080/auth/realms/workshop/protocol/openid-connect/certs",
  "check_session_iframe": "http://localhost:8080/auth/realms/workshop/protocol/openid-connect/login-status-iframe.html",
  "grant_types_supported": [
    "authorization_code",
    "implicit",
    "refresh_token",
    "password",
    "client_credentials"
  ],
  "response_types_supported": [
    "code",
    "none",
    "id_token",
    "token",
    "id_token token",
    "code id_token",
    "code token",
    "code id_token token"
  ],
  ...
}
The web security configuration looks like the ones we have seen before with all that authorization rule settings. The addition here is just for replacing the basic authentication with bearer token authentication (expected in the http header). Additionally there are two possible alternative JWT converters referenced there.
Usually this configuration would be sufficient but as we also want to make sure that our resource server is working with stateless token authentication we have to configure stateless sessions (i.e. prevent JSESSION cookies). Starting with Spring Boot 2 you always have to configure Spring Security yourself as soon as you introduce a class that extends WebSecurityConfigurerAdapter.
package com.example.library.server.config;

import com.example.library.server.common.Role;
import com.example.library.server.security.LibraryReactiveUserDetailsService;
import org.springframework.beans.factory.annotation.Autowired;
import org.springframework.boot.actuate.autoconfigure.security.reactive.EndpointRequest;
import org.springframework.boot.autoconfigure.security.reactive.PathRequest;
import org.springframework.context.annotation.Bean;
import org.springframework.http.HttpMethod;
import org.springframework.security.config.annotation.method.configuration.EnableReactiveMethodSecurity;
import org.springframework.security.config.annotation.web.reactive.EnableWebFluxSecurity;
import org.springframework.security.config.http.SessionCreationPolicy;
import org.springframework.security.config.web.server.ServerHttpSecurity;
import org.springframework.security.web.server.SecurityWebFilterChain;

@EnableWebFluxSecurity
@EnableReactiveMethodSecurity
public class WebSecurityConfiguration {

  private final LibraryReactiveUserDetailsService libraryReactiveUserDetailsService;

  @Autowired
  public WebSecurityConfiguration(
      LibraryReactiveUserDetailsService libraryReactiveUserDetailsService) {
    this.libraryReactiveUserDetailsService = libraryReactiveUserDetailsService;
  }

  @Bean
  public SecurityWebFilterChain springSecurityFilterChain(ServerHttpSecurity http) {
        http
        .sessionManagement()
        .sessionCreationPolicy(SessionCreationPolicy.STATELESS)
        .and()
        .csrf()
        .disable()
        .authorizeExchange()
        .matchers(PathRequest.toStaticResources().atCommonLocations())
        .permitAll()
        .matchers(EndpointRequest.to("health"))
        .permitAll()
        .matchers(EndpointRequest.to("info"))
        .permitAll()
        .matchers(EndpointRequest.toAnyEndpoint())
        .hasRole(Role.LIBRARY_ADMIN.name())
        .pathMatchers(HttpMethod.POST, "/books/{bookId}/borrow")
        .hasRole(Role.LIBRARY_USER.name())
        .pathMatchers(HttpMethod.POST, "/books/{bookId}/return")
        .hasRole(Role.LIBRARY_USER.name())
        .pathMatchers(HttpMethod.POST, "/books")
        .hasRole(Role.LIBRARY_CURATOR.name())
        .pathMatchers(HttpMethod.DELETE, "/books")
        .hasRole(Role.LIBRARY_CURATOR.name())
        .pathMatchers("/users/**")
        .hasRole(Role.LIBRARY_ADMIN.name())
        .anyExchange()
        .authenticated()
        .and()
        .oauth2ResourceServer() (1)
        .jwt() (2)
        .jwtAuthenticationConverter(libraryUserJwtAuthenticationConverter()); (3)
    // .jwtAuthenticationConverter(libraryUserRolesJwtAuthenticationConverter());
    return http.build();
  }

  @Bean
  public LibraryUserJwtAuthenticationConverter libraryUserJwtAuthenticationConverter() {
    return new LibraryUserJwtAuthenticationConverter(libraryReactiveUserDetailsService);
  }

  @Bean
  public LibraryUserRolesJwtAuthenticationConverter libraryUserRolesJwtAuthenticationConverter() {
    return new LibraryUserRolesJwtAuthenticationConverter(libraryReactiveUserDetailsService);
  }
}| 1 | Auto configuration for an OAuth2 resource server |
| 2 | Configures JSON web token (JWT) handling for this resource server |
| 3 | Configures a JWT authentication converter to map JWT to an Authentication object |
This configuration above…
-
configures stateless sessions (i.e. no JSESSION cookies)
-
disables CSRF protection (without session cookies we do not need this any more) (which also makes it possible to make post requests on the command line)
-
protects any request (i.e. requires authentication)
-
enables this as a resource server with expecting access tokens in JWT format
With mapping user information like roles you always have the choice between
-
Getting the roles information from the JWT token payload
-
Getting the roles information from the mapped local persistent user
The converter for getting roles from JWT token looks like the following:
package com.example.library.server.config;

import com.example.library.server.security.LibraryReactiveUserDetailsService;
import org.springframework.core.convert.converter.Converter;
import org.springframework.security.authentication.AbstractAuthenticationToken;
import org.springframework.security.authentication.UsernamePasswordAuthenticationToken;
import org.springframework.security.core.GrantedAuthority;
import org.springframework.security.core.authority.SimpleGrantedAuthority;
import org.springframework.security.oauth2.jwt.Jwt;
import reactor.core.publisher.Mono;

import java.util.Collection;
import java.util.Collections;
import java.util.stream.Collectors;

/** JWT converter that takes the roles from 'groups' claim of JWT token. */
public class LibraryUserJwtAuthenticationConverter
    implements Converter<Jwt, Mono<AbstractAuthenticationToken>> {
  private static final String GROUPS_CLAIM = "groups";
  private static final String ROLE_PREFIX = "ROLE_";

  private final LibraryReactiveUserDetailsService libraryReactiveUserDetailsService;

  public LibraryUserJwtAuthenticationConverter(
      LibraryReactiveUserDetailsService libraryReactiveUserDetailsService) {
    this.libraryReactiveUserDetailsService = libraryReactiveUserDetailsService;
  }

  @Override
  public Mono<AbstractAuthenticationToken> convert(Jwt jwt) { (1)
    Collection<GrantedAuthority> authorities = extractAuthorities(jwt);
    return libraryReactiveUserDetailsService
        .findByUsername(jwt.getClaimAsString("email"))
        .map(u -> new UsernamePasswordAuthenticationToken(u, "n/a", authorities));
  }

  private Collection<GrantedAuthority> extractAuthorities(Jwt jwt) { (2)
    return this.getScopes(jwt).stream()
        .map(authority -> ROLE_PREFIX + authority.toUpperCase())
        .map(SimpleGrantedAuthority::new)
        .collect(Collectors.toList());
  }

  @SuppressWarnings("unchecked")
  private Collection<String> getScopes(Jwt jwt) { (3)
    Object scopes = jwt.getClaims().get(GROUPS_CLAIM);
    if (scopes instanceof Collection) {
      return (Collection<String>) scopes;
    }

    return Collections.emptyList();
  }
}| 1 | Map JWT to Authentication object with matching user and roles (Authorities) from JWT token |
| 2 | Extract the scopes from JWT and map these to roles |
| 3 | Get scopes from 'groups' claim |
The converter for using the roles from the mapped local user looks like this:
package com.example.library.server.config;

import com.example.library.server.security.LibraryReactiveUserDetailsService;
import org.springframework.core.convert.converter.Converter;
import org.springframework.security.authentication.AbstractAuthenticationToken;
import org.springframework.security.authentication.UsernamePasswordAuthenticationToken;
import org.springframework.security.oauth2.jwt.Jwt;
import reactor.core.publisher.Mono;

/** JWT converter that takes the roles from persistent user roles. */
public class LibraryUserRolesJwtAuthenticationConverter
    implements Converter<Jwt, Mono<AbstractAuthenticationToken>> {

  private final LibraryReactiveUserDetailsService libraryReactiveUserDetailsService;

  public LibraryUserRolesJwtAuthenticationConverter(
      LibraryReactiveUserDetailsService libraryReactiveUserDetailsService) {
    this.libraryReactiveUserDetailsService = libraryReactiveUserDetailsService;
  }

  @Override
  public Mono<AbstractAuthenticationToken> convert(Jwt jwt) { (1)
    return libraryReactiveUserDetailsService
        .findByUsername(jwt.getClaimAsString("email"))
        .map(u -> new UsernamePasswordAuthenticationToken(u, "n/a", u.getAuthorities()));
  }
}| 1 | Map JWT to Authentication object with matching user and roles (Authorities) from user as well |
To start the resource server simply run the class LibraryServerApplication in project lab-5/complete-resource-server.
In the following paragraphs we now proceed to the client side of the OAuth2/OIDC part.
7.5. Lab 6: OpenID Connect Client
7.5.1. Gradle dependencies
To use the new OAuth2 client support of Spring Security 5.1 you have to add the following required dependencies to the existing gradle build file.
dependencies {
    ...
    implementation('org.springframework.boot:spring-boot-starter-oauth2-client') (1)
	...
}| 1 | Spring Boot starter for OAuth2 client including core OAuth2/OIDC client and JOSE (Javascript Object Signing and Encryption) framework to support for example JSON Web Token (JWT) |
7.5.2. Implementation steps
First step is to configure an OAuth2/OIDC client. For this you have to register the corresponding identity server/authorization server to use. Here you have two possibilities:
-
You can just use one of the predefined ones (Facebook, Google, etc.)
-
You register your own custom server
Spring security provides the enumeration CommonOAuth2Provider which defines registration details for a lot of well known identity providers.
package org.springframework.security.config.oauth2.client;
...
public enum CommonOAuth2Provider {

	GOOGLE {

		@Override
		public Builder getBuilder(String registrationId) {
			ClientRegistration.Builder builder = getBuilder(registrationId,
					ClientAuthenticationMethod.BASIC, DEFAULT_LOGIN_REDIRECT_URL);
			builder.scope("openid", "profile", "email");
			builder.authorizationUri("https://accounts.google.com/o/oauth2/v2/auth");
			builder.tokenUri("https://www.googleapis.com/oauth2/v4/token");
			builder.jwkSetUri("https://www.googleapis.com/oauth2/v3/certs");
			builder.userInfoUri("https://www.googleapis.com/oauth2/v3/userinfo");
			builder.userNameAttributeName(IdTokenClaimNames.SUB);
			builder.clientName("Google");
			return builder;
		}
	},

	GITHUB {

		@Override
		public Builder getBuilder(String registrationId) {
            ...
		}
	},

	FACEBOOK {

		@Override
		public Builder getBuilder(String registrationId) {
		    ...
		}
	},
	...
}
To use one of these providers is quite easy. Just reference the enumeration constant as the provider.
spring:
  security:
    oauth2:
      client:
        registration:
          google-login:	(1)
            provider: google (2)
            client-id: google-client-id
client-secret: google-client-secret| 1 | The registration id is set to google-login |
| 2 | The provider is set to the predefined google client which points to CommonOAuth2Provider.GOOGLE |
|
You can find a sample application using the common provider for GitHub in project intro-labs/github-client. |
But in this workshop we will focus on the second possibility and use our own custom identity provider service.
To achieve this we add the following sections to the application.yml file.
Spring security 5 uses the [OpenID Connect Discovery](https://openid.net/specs/openid-connect-discovery-1_0.html#ProviderConfig) specification to completely configure the client to use our keycloak instance.
For configuring an OAuth2 client the important entries are issuer, authorization_endpoint, token_endpoint, userinfo_endpoint and jwks_uri. Spring Security 5 automatically configures an OAuth2 client by just specifying the issuer uri value as part of the predefined spring property spring.security.oauth2.client.provider.[id].issuer-uri.
For OAuth2 clients you always have to specify the client registration (with client id, client secret, authorization grant type, redirect uri to your client callback and optionally the scope). The client registration requires an OAuth2 provider. If you want to use your own provider you have to configure at least the issuer uri. We want to change the default user name mapping for the user identity as well ( using the user name instead of the default value 'sub').
server:
  port: 9090

spring:
  security:
      oauth2:
        client:
          registration:
            keycloak: (1)
              client-id: 'library-client'
              client-secret: '9584640c-3804-4dcd-997b-93593cfb9ea7'
              authorizationGrantType: authorization_code
              redirect-uri: '{baseUrl}/login/oauth2/code/{registrationId}'
              scope: openid
          provider:
            keycloak:
              issuerUri: http://localhost:8080/auth/realms/workshop (2)
user-name-attribute: name| 1 | Client configuration like client-id and client-secret credentials and where to redirect to |
| 2 | The issuer url is used to look up the well known configuration page to get all required configuration settings to set up a client |
As the library-server is now configured as an OAuth2 resource server it requires a valid JWT token to successfully call the /books endpoint now.
For all requests to the resource server we use the reactive web client, that was introduced by Spring 5. WebClient is the successor of RestTemplate and works for both worlds (Servlet-based and reactive).
The next required step is to make this web client aware of transmitting the required bearer access tokens in the Authorization header.
To support JWT tokens in calls we have to add a client interceptor to the WebClient. The following code snippet shows how this is done:
package com.example.oauth2loginclient.config;

import org.springframework.context.annotation.Bean;
import org.springframework.context.annotation.Configuration;
import org.springframework.security.oauth2.client.registration.ReactiveClientRegistrationRepository;
import org.springframework.security.oauth2.client.web.reactive.function.client.ServerOAuth2AuthorizedClientExchangeFilterFunction;
import org.springframework.security.oauth2.client.web.server.ServerOAuth2AuthorizedClientRepository;
import org.springframework.web.reactive.function.client.WebClient;

@Configuration
public class WebClientConfiguration {

    @Bean
    WebClient webClient(ReactiveClientRegistrationRepository clientRegistrationRepository,
                        ServerOAuth2AuthorizedClientRepository authorizedClientRepository) {
        ServerOAuth2AuthorizedClientExchangeFilterFunction oauth = (1)
                new ServerOAuth2AuthorizedClientExchangeFilterFunction(clientRegistrationRepository,
                                                                          authorizedClientRepository);
        oauth.setDefaultOAuth2AuthorizedClient(true); (2)
        oauth.setDefaultClientRegistrationId("keycloak"); (3)
        return WebClient.builder()
                .filter(oauth) (4)
                .build();
    }
}| 1 | Creates a filter for handling all the OAuth2 token stuff (i.e. initiating the OAuth2 code grant flow) |
| 2 | Set this OAuth2 client as default for all requests (Do not set this if you have requests that do not require access tokens) |
| 3 | Registration id for client for automatic token handling |
| 4 | Add the filter to webclient |
With this additions we add a filter function to the web client that automatically adds the access token to all requests and also initiates the authorization grant flow if no valid access token is available.
Finally we need an updated client side security configuration to allow client endpoints and enable the OAuth2 client features:
package com.example.oauth2loginclient.config;

import org.springframework.context.annotation.Bean;
import org.springframework.context.annotation.Configuration;
import org.springframework.security.config.annotation.web.reactive.EnableWebFluxSecurity;
import org.springframework.security.config.web.server.ServerHttpSecurity;
import org.springframework.security.web.server.SecurityWebFilterChain;

@EnableWebFluxSecurity
@Configuration
public class SecurityConfiguration {

  @Bean
  SecurityWebFilterChain configure(ServerHttpSecurity http) {
    http.authorizeExchange().anyExchange().authenticated().and().oauth2Login().and().oauth2Client(); (1)
    return http.build();
  }
}| 1 | Configure library client app as a OAuth2/OIDC client |
The client is build as a Thymeleaf web client. Thymeleaf basically works with HTML template files with some specials tags to connect the template with Spring beans.
In our case there are already 3 HTML templates:
-
index.html: The main template that is displayed initially to show list of books
-
createbookform.html: This renders a form to create a new book
-
users.html: This shows the list of users retrieved from the library server
-
error.html: Template to show errors
To map these HTML template files to the web request paths and also map the content (the 'model' as it is called in Spring MVC) a controller class (annotated with @Controller) is required.
The corresponding class for the '/books' request is shown here.
package com.example.oidc.client.api;

import com.example.oidc.client.api.resource.BookResource;
import com.example.oidc.client.api.resource.CreateBookResource;
import org.springframework.beans.factory.annotation.Value;
import org.springframework.http.HttpStatus;
import org.springframework.security.access.AccessDeniedException;
import org.springframework.security.authentication.BadCredentialsException;
import org.springframework.security.core.annotation.AuthenticationPrincipal;
import org.springframework.security.oauth2.core.user.OAuth2User;
import org.springframework.stereotype.Controller;
import org.springframework.ui.Model;
import org.springframework.web.bind.annotation.GetMapping;
import org.springframework.web.bind.annotation.ModelAttribute;
import org.springframework.web.bind.annotation.PostMapping;
import org.springframework.web.bind.annotation.RequestParam;
import org.springframework.web.reactive.function.client.WebClient;
import org.springframework.web.server.ServerWebExchange;
import reactor.core.publisher.Flux;
import reactor.core.publisher.Mono;

import java.io.IOException;

@Controller
public class BookController { (1)

  private final WebClient webClient;

  @Value("${library.server}")
  private String libraryServer;

  public BookController(WebClient webClient) {
    this.webClient = webClient;
  }

  @ModelAttribute("books")
  Flux<BookResource> books() { (2)
    return webClient
        .get()
        .uri(libraryServer + "/books")
        .retrieve()
        .onStatus(
            s -> s.equals(HttpStatus.UNAUTHORIZED),
            cr -> Mono.just(new BadCredentialsException("Not authenticated")))
        .onStatus(
            s -> s.equals(HttpStatus.FORBIDDEN),
            cr -> Mono.just(new AccessDeniedException("Not authorized")))
        .onStatus(
            HttpStatus::is4xxClientError,
            cr -> Mono.just(new IllegalArgumentException(cr.statusCode().getReasonPhrase())))
        .onStatus(
            HttpStatus::is5xxServerError,
            cr -> Mono.just(new Exception(cr.statusCode().getReasonPhrase())))
        .bodyToFlux(BookResource.class);
  }

  @GetMapping("/")
  Mono<String> index(@AuthenticationPrincipal OAuth2User user, Model model) { (3)

    model.addAttribute("fullname", user.getName());
    model.addAttribute(
        "isCurator",
        user.getAuthorities().stream().anyMatch(ga -> ga.getAuthority().equals("library_curator")));
    return Mono.just("index");
  }

  @GetMapping("/createbook")
  String createForm(Model model) { (4)

    model.addAttribute("book", new CreateBookResource());

    return "createbookform";
  }

  @PostMapping("/create")
  Mono<String> create( (5)
      CreateBookResource createBookResource, ServerWebExchange serverWebExchange, Model model)
      throws IOException {

    return webClient
        .post()
        .uri(libraryServer + "/books")
        .body(Mono.just(createBookResource), CreateBookResource.class)
        .retrieve()
        .onStatus(
            s -> s.equals(HttpStatus.UNAUTHORIZED),
            cr -> Mono.just(new BadCredentialsException("Not authenticated")))
        .onStatus(
            s -> s.equals(HttpStatus.FORBIDDEN),
            cr -> Mono.just(new AccessDeniedException("Not authorized")))
        .onStatus(
            HttpStatus::is4xxClientError,
            cr -> Mono.just(new IllegalArgumentException(cr.statusCode().getReasonPhrase())))
        .onStatus(
            HttpStatus::is5xxServerError,
            cr -> Mono.just(new Exception(cr.statusCode().getReasonPhrase())))
        .bodyToMono(BookResource.class)
        .then(Mono.just("redirect:/"));
  }

  @GetMapping("/borrow") (6)
  Mono<String> borrowBook(@RequestParam("identifier") String identifier) {
    return webClient
        .post()
        .uri(libraryServer + "/books/{bookId}/borrow", identifier)
        .retrieve()
        .onStatus(
            s -> s.equals(HttpStatus.UNAUTHORIZED),
            cr -> Mono.just(new BadCredentialsException("Not authenticated")))
        .onStatus(
            s -> s.equals(HttpStatus.FORBIDDEN),
            cr -> Mono.just(new AccessDeniedException("Not authorized")))
        .onStatus(
            HttpStatus::is4xxClientError,
            cr -> Mono.just(new IllegalArgumentException(cr.statusCode().getReasonPhrase())))
        .onStatus(
            HttpStatus::is5xxServerError,
            cr -> Mono.just(new Exception(cr.statusCode().getReasonPhrase())))
        .bodyToMono(BookResource.class)
        .then(Mono.just("redirect:/"));
  }

  @GetMapping("/return")
  Mono<String> returnBook( (7)
      @RequestParam("identifier") String identifier, ServerWebExchange serverWebExchange) {
    return webClient
        .post()
        .uri(libraryServer + "/books/{bookId}/return", identifier)
        .retrieve()
        .onStatus(
            s -> s.equals(HttpStatus.UNAUTHORIZED),
            cr -> Mono.just(new BadCredentialsException("Not authenticated")))
        .onStatus(
            s -> s.equals(HttpStatus.FORBIDDEN),
            cr -> Mono.just(new AccessDeniedException("Not authorized")))
        .onStatus(
            HttpStatus::is4xxClientError,
            cr -> Mono.just(new IllegalArgumentException(cr.statusCode().getReasonPhrase())))
        .onStatus(
            HttpStatus::is5xxServerError,
            cr -> Mono.just(new Exception(cr.statusCode().getReasonPhrase())))
        .bodyToMono(BookResource.class)
        .then(Mono.just("redirect:/"));
  }
}| 1 | Thymeleaf web controller for Books |
| 2 | Use reactive webclient to call 'books' endpoint on library resource server |
| 3 | Map '/' GET request to 'index.html' template |
| 4 | Render the form to create new book |
| 5 | Use reactive webclient to call POST 'books' endpoint on library resource server to create book |
| 6 | Use reactive webclient to call POST 'books' endpoint on library resource server to borrow a book |
| 7 | Use reactive webclient to call POST 'books' endpoint on library resource server to return a book |
In the client you can see the contents of the ID JWT token as well using the '/userinfo' endpoint. This endpoint is mapped to a @RestController.
package com.example.oauth2loginclient.api;

import org.springframework.security.core.annotation.AuthenticationPrincipal;
import org.springframework.security.oauth2.core.user.OAuth2User;
import org.springframework.web.bind.annotation.GetMapping;
import org.springframework.web.bind.annotation.RestController;
import reactor.core.publisher.Mono;

import java.util.Map;

@RestController
public class UserInfoRestController {

  @GetMapping("/userinfo")
  Mono<Map<String, Object>> userInfo(@AuthenticationPrincipal OAuth2User oauth2User) {
    return Mono.just(oauth2User.getAttributes()); (1)
  }
}| 1 | Retrieve all attributes of ID JWT token of current authenticated user |
Run all the components
Finally start the two components:
-
Run CompleteResourceServerApplication class in project lab-5/complete-resource-server
-
Run InitialOidcClientApplication class in project lab-6/initial-oidc-client
Now when you access localhost:9090/userinfo you should be redirected to the keycloak identity server. After logging in you should get the current authenticated user info back from identity server.
Here you can log in using one of these predefined users:
Username |
Password |
Roles |
|
bwayne |
wayne |
LIBRARY_USER |
|
bbanner |
banner |
LIBRARY_USER |
|
pparker |
parker |
LIBRARY_CURATOR |
|
ckent |
kent |
LIBRARY_ADMIN |
You can now access localhost:9090 as well. This returns the book list from the library-server (resource server).
Logout Users
After you have logged in into the library client using keycloak your session will remain valid until the access token has expired or the session at keycloak is invalidated.
As the library client does not have a logout functionality, you have to follow the following steps to actually log out users:
-
Login to keycloak admin console and navigate on the left to menu item session Here you’ll see all user sessions (active/offline ones). By clicking on button Logout all you can revocate all active sessions.
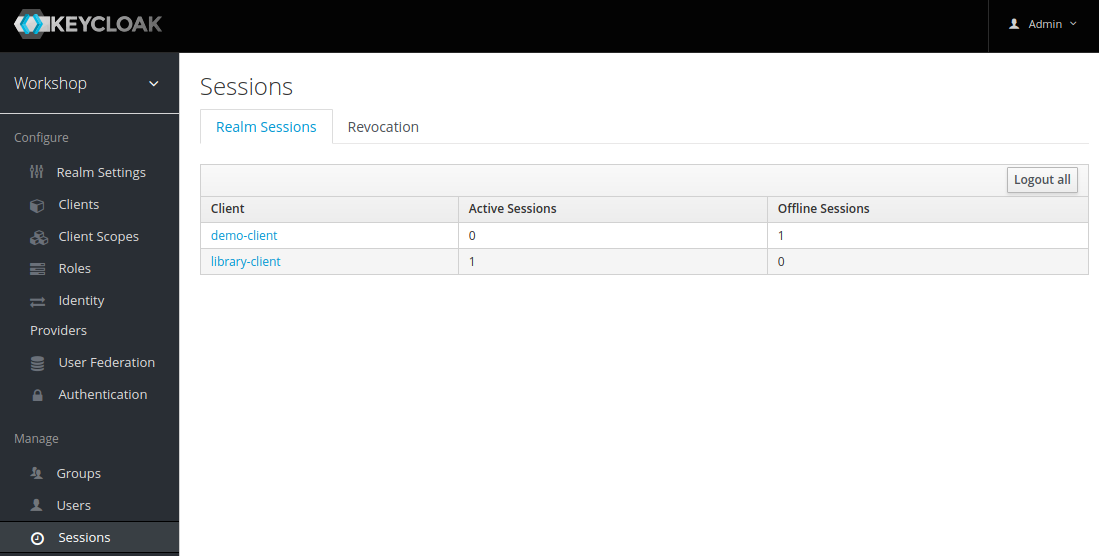
-
After you have revocated sessions in keycloak you have to delete the current JSESSION cookie for the library client. You can do this by opening the application tab in the developer tools of chrome. Navigate to the cookies entry on the left and select the url of the library client, then delete the cookie on the right hand side
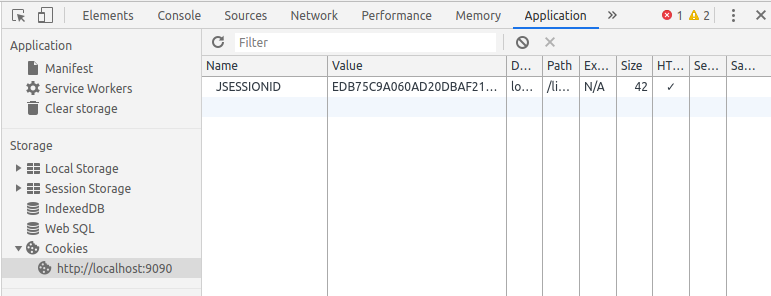
Now when you refresh the library client in the browser you should be redirected again to the login page of keycloak.
|
You find the completed code in project lab-6/complete-oidc-client. |
This concludes our Spring Security 5.1 hands-on workshop. I hope you have learned a lot regarding security and especially Spring Security 5.1.
|
So take the next step and make YOUR applications more secure ! |
8. Feedback
References
Appendix A: Copyright and License
Copyright © 2019 by Andreas Falk.
Free use of this software is granted under the terms of the Apache 2.0 License.